How to Edit the Master Slides in Our Templates

Essentially, master slides serve as blueprints for the rest of the slides within a presentation, providing a centralized location to control the design elements and formatting aspects.
Imagine master slides as the artistic backbone of your presentation, allowing you to establish a consistent theme, style, and layout throughout your entire deck. They act as the ultimate source of authority, dictating the font type, size, and color, background design, placeholders for text and media, headers, footers, and other essential elements that make up each slide.
Why is It Important to Edit Master Slides?
By modifying the master slides, you can effectuate uniform changes across your entire presentation with unparalleled ease. Suppose you decide to adjust the background color, change the font style, or incorporate a company logo on every slide. Instead of tediously updating each slide individually, you can simply tweak the master slides, and the changes seamlessly propagate to every associated slide. This capability ensures that you can maintain a cohesive and polished appearance without investing significant time and effort.
Moreover, master slides allow for incredible versatility. You can tweak multiple master slides to cater to different sections or segments of your presentation. For instance, if you have distinct sections discussing various topics, you can assign a specific master slide to each section, complete with tailored backgrounds, color schemes, and layouts.
Additionally, master slides facilitate collaboration and consistency among team members. When working on a group project or a corporate presentation, different individuals might contribute slides. By adhering to a set of predefined master slides, everyone can align with the established visual guidelines, ensuring a harmonious and professional outcome. It ensures that the presentation feels like a unified whole rather than a disjointed collection of slides.
How to Edit the Master Slides, Layouts, and Theme in Our Templates
Editing master slides is a skill that empowers presenters to truly customize and refine the visual appearance of their presentations. We try to make universal presentation templates. So in order to add your logo, customize your templates, and set up your presentation before using it, you need to understand how to set up your master slides. By making strategic modifications to the master slides, you can unleash your creativity and ensure a cohesive and professional look across your entire slide deck. Here's a step-by-step guide on how to edit master slides.
Open our template in Google Slides and navigate to the slide master view. At the top of the screen, click on the "Slide" menu and select "Edit theme."
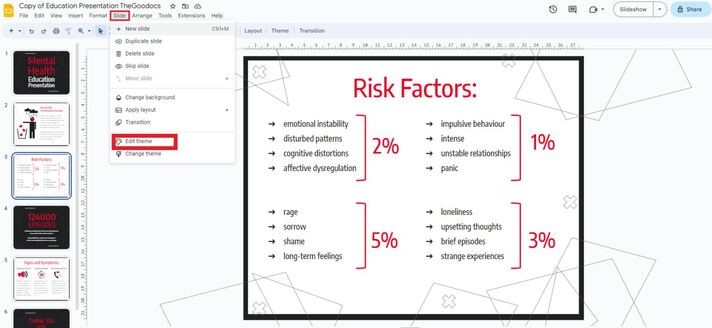
Google Slides will switch to the master slide view, where you can see a thumbnail view of all the available layouts for your presentation.
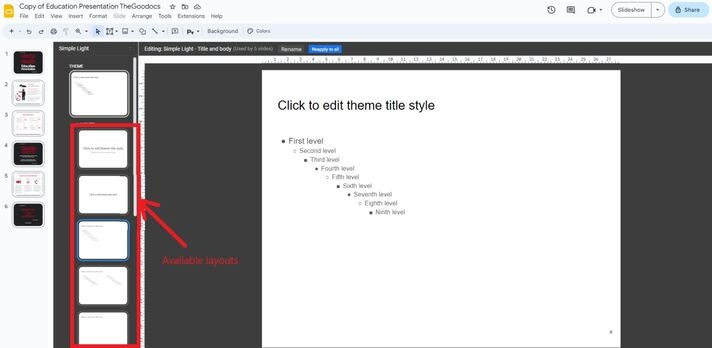
To make changes to a specific master slide, click on its thumbnail. It will bring up the editing options for that particular master slide. Customize the layout and placeholders on the master slide. You can adjust the position, size, and orientation of text boxes, image placeholders, and other content elements. You can also add or remove placeholders as needed. You have complete freedom to customize any design element.
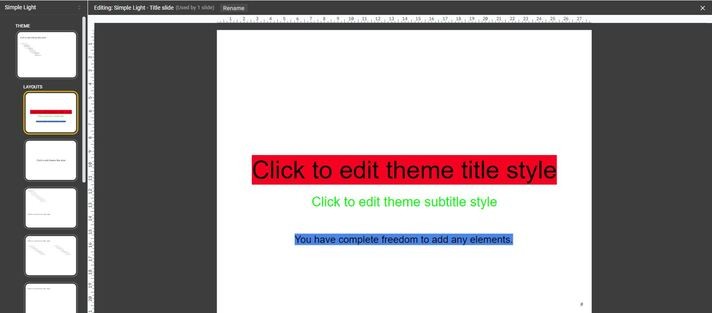
- Modify the fonts and typography. Use the toolbar options to change the font type, size, color, and style for various text elements on the master slide. Ensure consistency with the overall theme, and consider using different font styles for headings, subheadings, and body text.
- Adjust the color scheme. Use the toolbar options to change the background color of the master slide and the text color for different elements. You can also experiment with adding gradients, patterns, or images as backgrounds.
- Incorporate branding elements. To add a logo or other branding elements, click on the "Insert" menu and select "Image" or "Shape" to add the desired element. Resize and position it accordingly on the master slide. You can also adjust its transparency and layering using the toolbar options.
- Preview and fine-tune. Regularly review the master slides by clicking on the slide thumbnails on the left side of the screen. Make any necessary adjustments to ensure consistency and visual appeal across all slides.
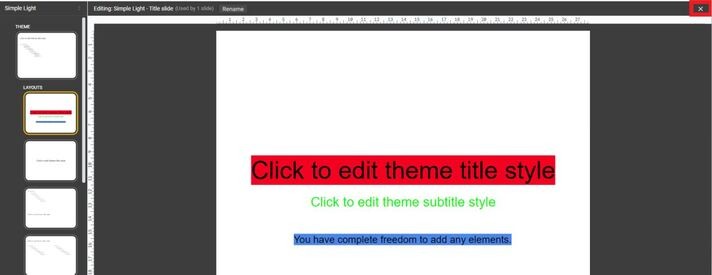
After you apply all changes by clicking “Reapply to all”, all changes are coming into force.

To exit the master slide view and return to the normal slide view, click on the cross in the upper right corner.
Conclusion
By mastering the art of editing master slides, you gain the ability to customize every aspect of your presentation's design. This level of control enables you to create visually captivating and impactful slideshows that leave a lasting impression on your audience. So, embrace your creativity, experiment with different design elements, and let your edited master slides breathe life into your presentations.

We are a team of creative people who dream of sharing knowledge and making your work and study easier. Our team of professional designers prepares unique free templates. We create handy template descriptions for you to help you choose the most suitable one. On our blog, you'll find step-by-step tutorials on how to use Google Products. And our YouTube channel will show you all the ins and outs of Google products with examples.


