Top categories

Newspapers Newsletters Restaurant menus Resume Brochures

Business

Agendas Budgets Business cards Business plans Business proposals Invoices Letterheads Project management Reports

Documents

Articles Cover letters Press Releases

Education

Books Class schedules Classroom announcements Classroom decors Education presentations Family Tree Lesson plans Newspapers Notes Planners Schedules Worksheets

Marketing

Amazon product Award certificates Booklets Brochures Catalog Certificates Flyers Handouts Headers Labels Magazines Newsletters Portfolio PostCards Posters Restaurant menus

Other

Google Drawings Sheets

Personal

Calendars Checklists CVs Funeral Programs Invitations Itinerary Journals Lists Photo Albums Recipes Resume

Social Media

Facebook Cover Facebook Posts Instagram Posts Instagram Stories YouTube Thumbnail
All Free Templates Blog Tips & Tutorials Requests
Templates
  • Top
  • Newspapers
  • Newsletters
  • Restaurant menus
  • Resume
  • Brochures
  • Business
  • Agendas
  • Budgets
  • Business cards
  • Business plans
  • Business proposals
  • Invoices
  • Letterheads
  • Project management
  • Reports
  • Documents
  • Articles
  • Cover letters
  • Press Releases
  • Education
  • Books
  • Class schedules
  • Classroom announcements
  • Classroom decors
  • Education presentations
  • Family Tree
  • Lesson plans
  • Newspapers
  • Notes
  • Planners
  • Schedules
  • Worksheets
  • Marketing
  • Amazon product
  • Award certificates
  • Booklets
  • Brochures
  • Catalog
  • Certificates
  • Flyers
  • Handouts
  • Headers
  • Labels
  • Magazines
  • Newsletters
  • Portfolio
  • PostCards
  • Posters
  • Restaurant menus
  • Other
  • Google Drawings
  • Sheets
  • Personal
  • Calendars
  • Checklists
  • CVs
  • Funeral Programs
  • Invitations
  • Itinerary
  • Journals
  • Lists
  • Photo Albums
  • Recipes
  • Resume
  • Social Media
  • Facebook Cover
  • Facebook Posts
  • Instagram Posts
  • Instagram Stories
  • YouTube Thumbnail
Blog Tips & Tutorials Requests
Premium Templates Add to Chrome
GoodDocs
GoodDocs
All categories
Popular Categories
  • All Categories
  • Newspapers
  • Newsletters
  • Restaurant menus
  • Resume
  • Brochures
Formats
  • All Formats
  • Google Docs
  • Google Sheets
  • Google Slides
  • Google Drawings
  • Main
  • Tips & Tutorials
  • Google Documents Tutorials
  • How to Add Bullet and Sub-Bullet Points Lists in Google Docs?

How to Add Bullet and Sub-Bullet Points Lists in Google Docs?

calendar
May 11, 2022
eye
5187
In this tutorial, we will show you how to add bullet and sub-bullet points lists in Google Docs. We recommend you study this manual carefully and start practicing!
How to Add Bullet and Sub-Bullet Points Lists in Google Docs?
Checklist of crucial points we aim to highlight here:
  1. How to Create a Bulleted List?
  2. Other List Options
  3. List Customization
  4. Other Features

So, we’re going to add bullet points and create lists in Google Docs. There are several types of bulleted and numbered lists in Google Docs. Yet the simplest and the most common one is the classic bullet points list. And let us show you how to make one.


Watch the video from https://thegoodocs.com/ and find out how to add bullet and sub-bullet points lists in Google Docs:

How to Create a Bulleted List?

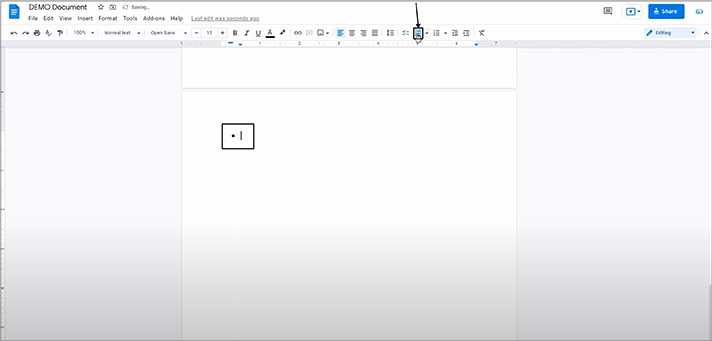
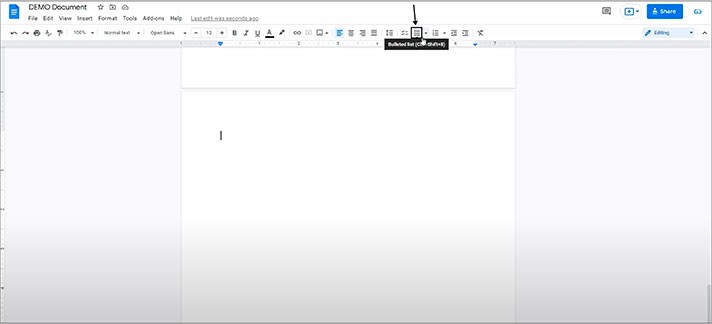
  • To add a bulleted list in the document, go to the “Bulleted list (Ctrl + Shift + 8)” item on the toolbar at the top of the page, which basically symbolizes what it is with the bullets and the lines. And click on it to insert the first bullet point, which is a start one
1
2
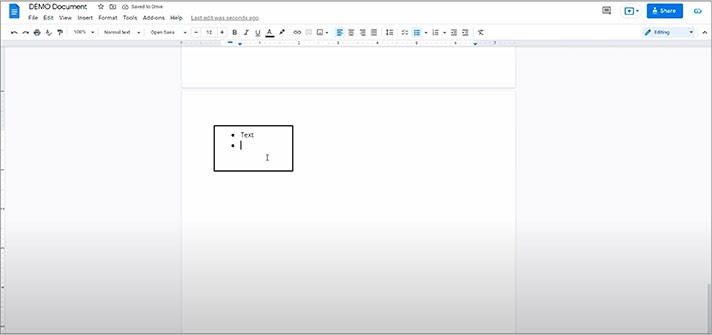
  • To keep adding points, you need to enter something on a line with the first point. And when you are ready to continue, press “Enter” at the end of the line after all the text. That’s how you add new bullet points
3
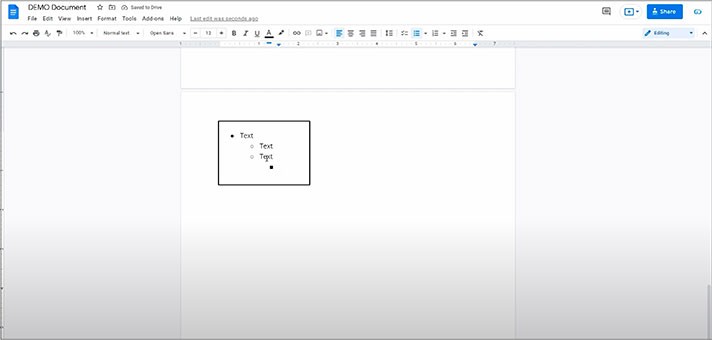
  • Then, there is an option to add sub-bullet points, which works this way: right after you have added a new bullet point and the line with it is empty, press “Tab” on the keyboard instead of entering the text. Then enter something. And you can keep adding new items to the list by pressing “Enter” at the end of each line, or you can push the bullets even farther to the right by pressing “Tab” on the empty line with a sub-bullet point once again
4
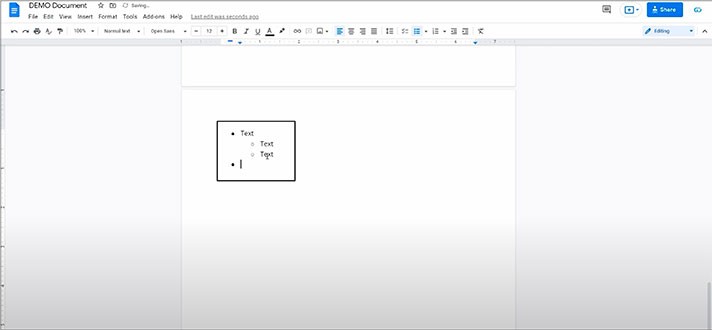
  • And if you want to return to adding the regular bullet points, press “Enter” on the empty line with the sub-bullet point. For example, here, we do that twice. And you can return to the sub-bullet and bullet points you need. There you go
5

Other List Options

Or you can apply the list formatting to already written text, but the data has to be on separate lines, and it will ignore the punctuation and other things. 
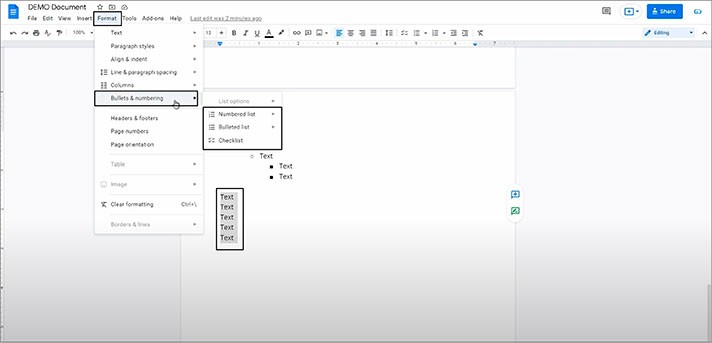
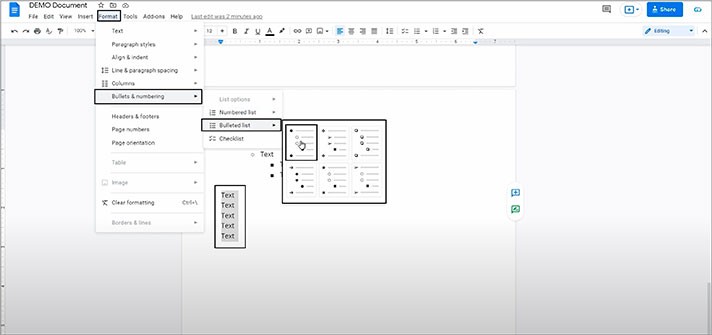
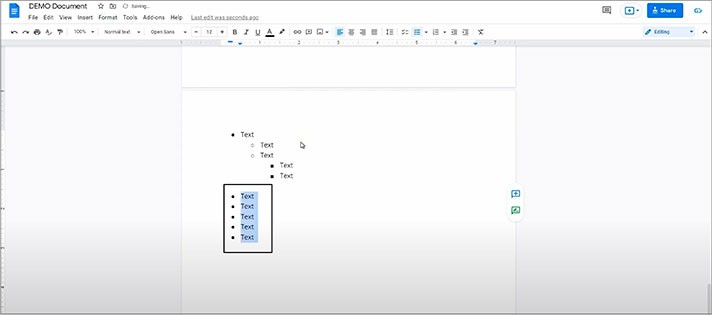
  • So, when you have put the necessary data on different lines, select all the data you need to make a list for and then go to “Format” on the toolbar at the top of the page, then go down to the “Bullets & numbering” line and drag the mouse to either the numbered or bulleted list. There is also the checklist option here in this menu. Now select the style of the list that you need. For example, we’ll choose the style of the bulleted list to show you the sample. And here it is
6
7
8

And then, you can actually transform one list type into another, for instance, from a bulleted list to a numbered list and backwards without losing the progress.
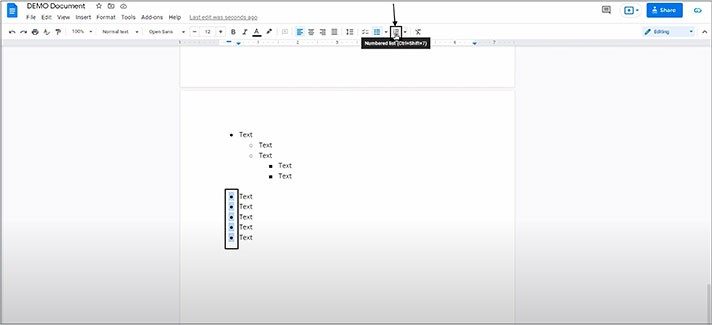
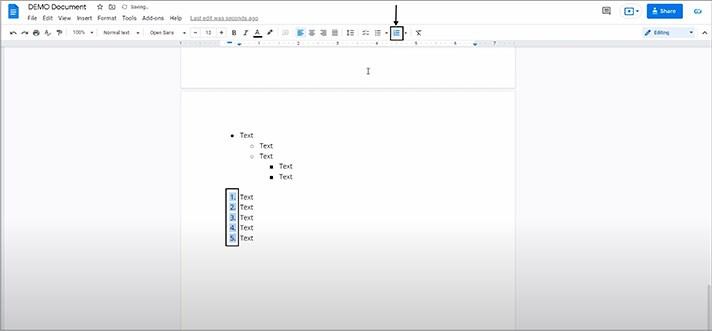
  • Once again, select the starting point (now we have the bulleted list points here), but this time go to the “Numbered list (Ctrl + Shift + 7)” item on the toolbar at the top of the page and click on it. And the bullet points turn into the numbers. And the same concerning the sub-points
9
10
lamp
NB! If you need to change the numbered list to the bulleted list, you can select the starting point and then go to the “Bulleted list (Ctrl + Shift + 8)” item on the toolbar at the top of the page and click on it. And the numbered points turn into the bulleted ones. And the same concerning the sub-points.
lamp
NB! To the left of the "Bulleted list (Ctrl + Shift + 8)" item on the toolbar at the top of the page, there is the "Checklist (Ctrl + Shift + 9)" item, which you can use to change the type of the list points to the checklist points.
  • To finish editing the list and return to the normal text, press “Enter” on the empty line with the bullet point

List Customization

Concerning customizing the looks of the list, you can change its style right in the middle of the action. 
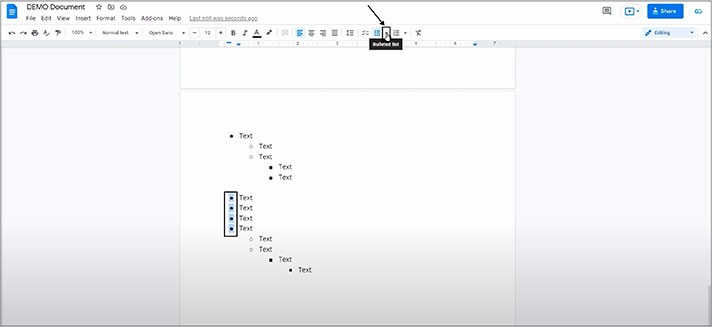
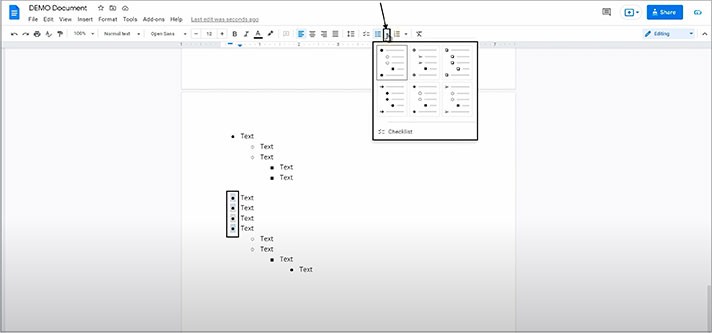
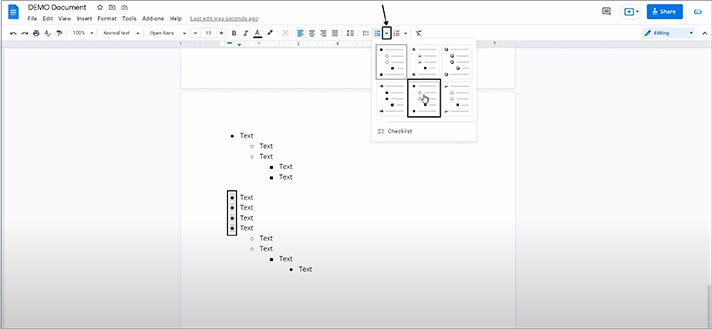
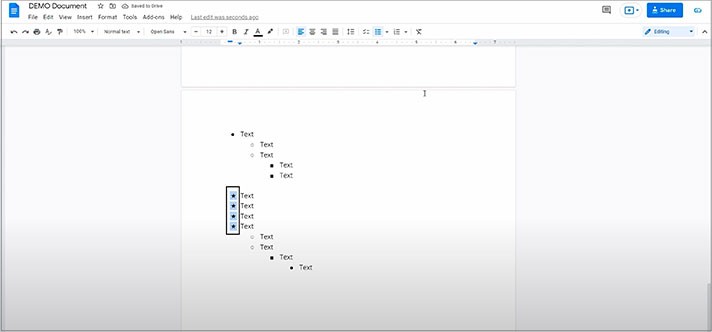
  • By clicking on the starting bullet point, it will highlight all the points in the list. Then you go to the bullet list icon (“Bulleted list (Ctrl + Shift + 8)”) on the toolbar at the top of the page and click on this little down arrow next to it. And select which style to apply. For instance, we’re choosing one to show you how it works. And here it is
11
12
13
14
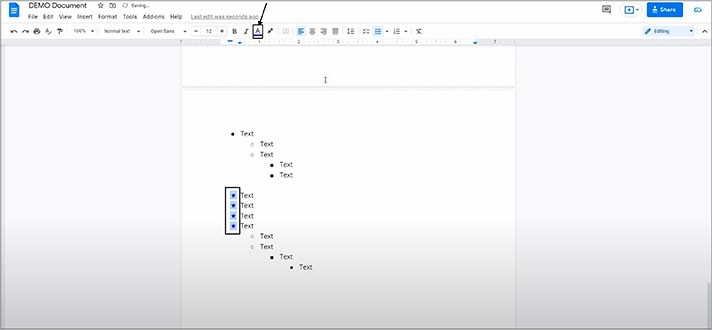
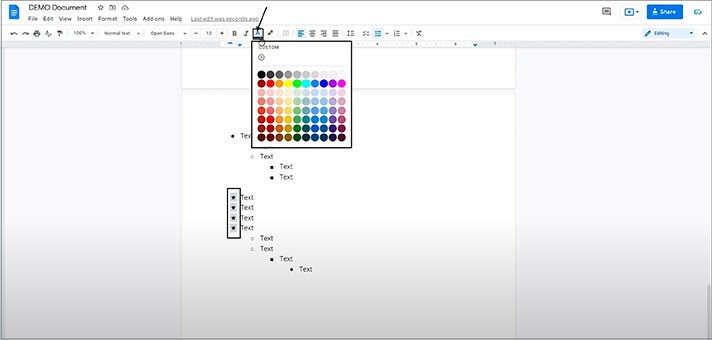
  • Then you can change the color of the bullet points all at once or individually. Select all of them by clicking on either one of them or double click to select a particular one. Then you go to the “Text color” item on the toolbar at the top of the page and apply the color you like to all the items or to the individual one(s). For example, we’ll choose a random color to show you how it works
15
16

Other Features

Google has a vast library of symbols and emojis, and you are can set any symbol as the point of the list. And we do it like this: 
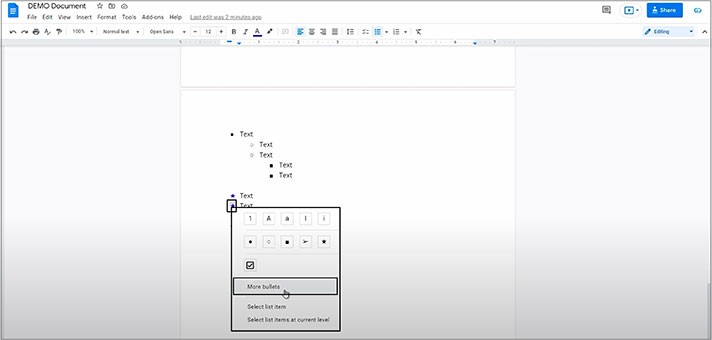
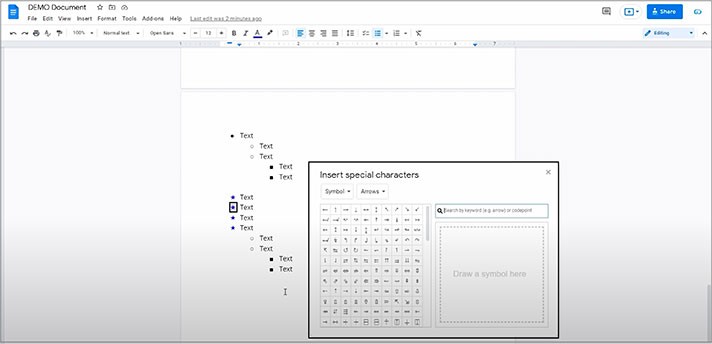
  • Select one or multiple points in the list by clicking on them. Right mouse click on any of the selected items. And in the menu, press “More bullets”. And here it is
17
18
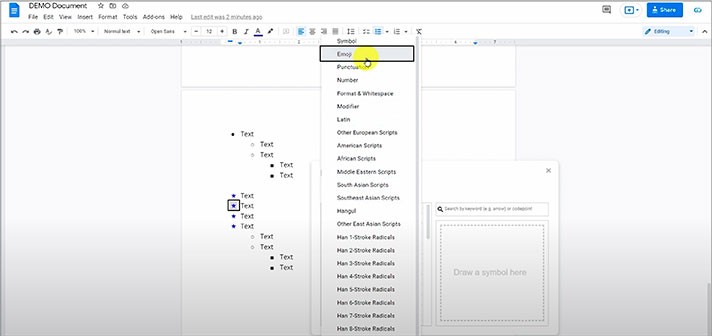
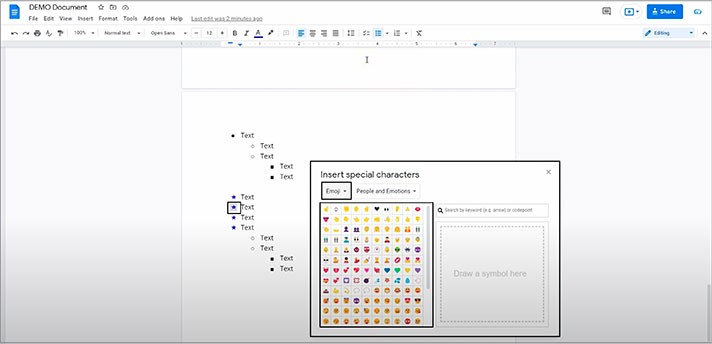
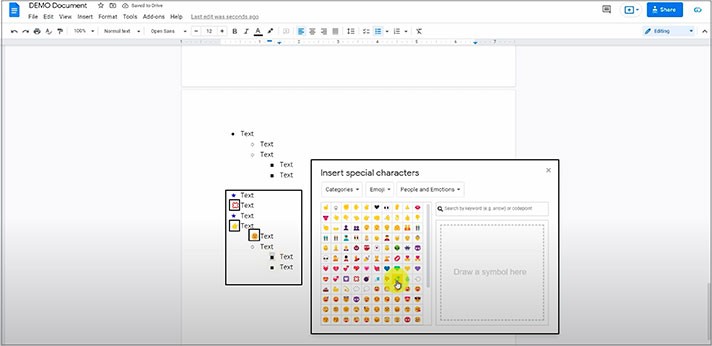
  • This symbol library is really huge, so, first, let’s choose the category in the “Symbol” drop-down. For example, we’ll select “Emoji” to show you how it works. Here they are, and you, basically, can set any emoji you see as a point in the list. We’ll choose the random emojis as the sample to show you how it works
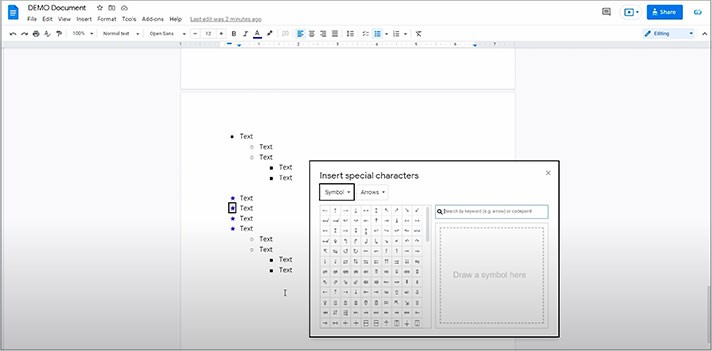
19
20
21
22
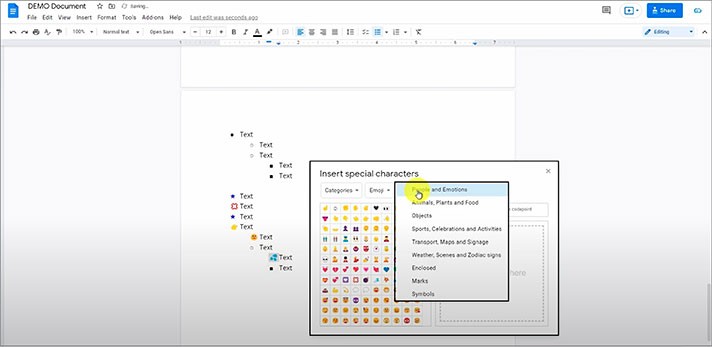
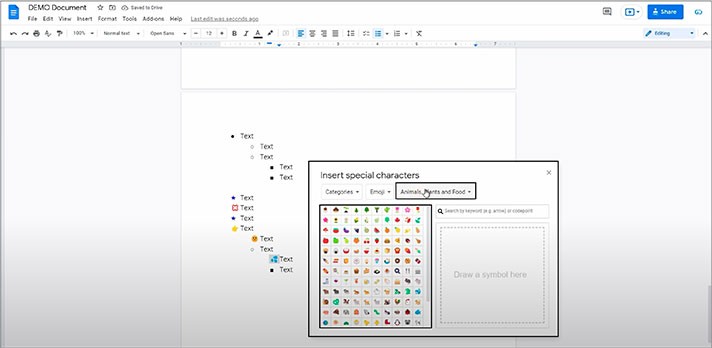
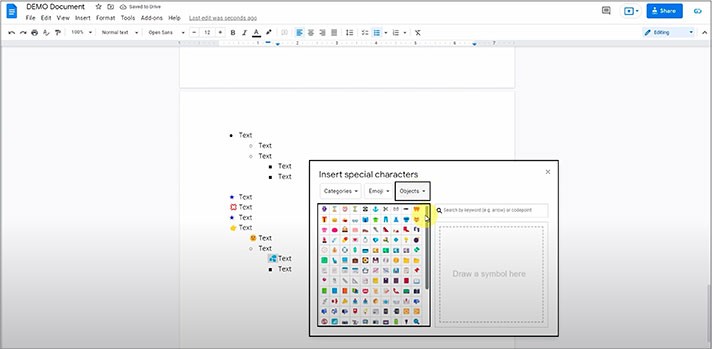
  • And then there’s the third drop-down with different groups of emojis, which altogether make the size of this library really large. For example, let’s look at some of the first groups of emojis: “Animals, Plants and Food” and “Objects”. And so on — there are lots of groups of emojis
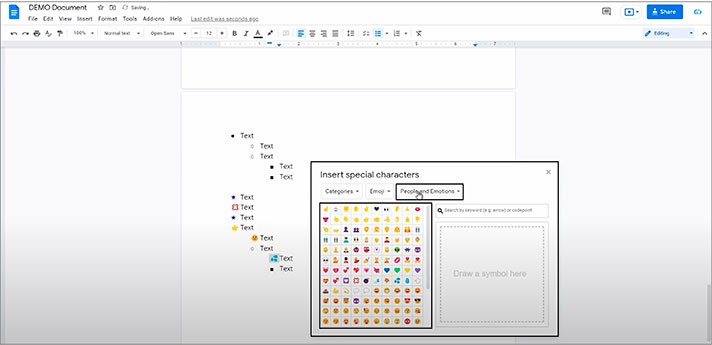
23
24
25
26

We hope this tutorial will help you learn how to add bullet and sub-bullet points lists in Google Docs. Good luck!

author
Written by
Team TheGoodocs

We are a team of creative people who dream of sharing knowledge and making your work and study easier. Our team of professional designers prepares unique free templates. We create handy template descriptions for you to help you choose the most suitable one. On our blog, you'll find step-by-step tutorials on how to use Google Products. And our YouTube channel will show you all the ins and outs of Google products with examples.

Popular Tutorials
How to Get and Use Google Docs Templates?
How to Get and Use Google Slides Templates for Free?
How to Search for a Word in Google Docs?
How to Add an Arrow in Google Docs?
Popular Templates
Old Times Newspaper - free Google Docs Template - 307
Old Times Newspaper
Vintage Newspaper - free Google Docs Template - 294
Vintage Newspaper
Restaurant Menu Design - free Google Docs Template - 118
Restaurant Menu Design
Elegant Newspaper - free Google Docs Template - 109
Elegant Newspaper
  • Sell your content
  • File Licenses
  • Terms and Conditions
  • Privacy Policy
  • Support
  • Cookie policy
© 2023 thegoodocs.com. All rights reserved

This Website uses cookies!

We use cookies to improve user experience within the website https://thegoodocs.com/ (the “Website”), analyzing Website’s traffic and trends as well as remembering user preferences and settings. For these reasons, We may share your app usage data with our analytics partners. By clicking “Accept Cookies,” you consent to store on your device all the technologies described in our Cookies Policy https://thegoodocs.com/static/cookies.php. More information about your data processing might be found in the Privacy Policy.

Accept all cookies Decline all