How to Write and Design an Invoice in Google Sheets
So, you've got a business and you're ready to start invoicing your clients. 💰
But where do you begin? Well, lucky for you, we know how to make it right. Although for a beginner creating invoices in Google Sheets is not easy, you are here to learn fast. Moreover, Google Sheets offers lots of benefits that in general make the process simple and engaging.
Firstly, Google Sheets is free to use, so you don't have to worry about any subscription fees eating into your profits. Secondly, it's accessible from any device with an internet connection, so you can create invoices on the go, whether you're at the office or sipping margaritas on a tropical island (dreamy, isn't it?).
Not to mention, many third-party websites provide a range of printable invoice templates with customization options, allowing you to create professional-looking invoices that align with your brand. Plus, the ability to collaborate with others in real time means you can easily get input from your team or accountant without any back-and-forth email chains.
We believe you already got interested, but first things first, let’s see what crucial information you should prepare (or at least, think over) before creating an invoice.
Information to Prepare Before Making an Invoice in Google Sheets
Why this step is mandatory?
Efficient invoicing is more than just sending out a piece of paper (or an email) requesting payment. It sets the tone for your professionalism, helps you keep track of your income, and ensures that your clients know exactly what they're paying for. Plus, when you have a smooth invoicing process in place, it frees up more time for you to focus on the fun stuff, like growing your business or simply taking a rest.
But imagine, your client receives an invoice with an incorrect address or payment details lack a digit. How they will pay you?
It happens when we are searching for information in different folders or last moment call the client to get their company’s details, hurry to type in data, and get rid of this “spreadsheet task”. That’s why we recommend placing all necessary information in one place or printing it out on paper.
- Identifying the necessary invoice details
First things first, you need to know what details your invoice should include. This usually consists of your business name and contact information, client's name and address, invoice number, payment terms, and a breakdown of the goods or services provided. Don't worry if this sounds overwhelming, later we'll break it down into steps and include them in the invoice.
- Collecting client and business information
Now that you know what information to include, it's time to gather the specifics. Collect your business details, such as your company name, address, and contact information. Then, double-check that you have your client's correct information on hand, including their name, address, and any other details relevant to your business relationship.
Pro tip: keep this information in a handy document or spreadsheet, so you don't have to play detective every time you need to create an invoice.
- Ensuring accurate pricing and itemization
Money matters, and so does accuracy. Take some time to review your pricing and ensure it aligns with your current rates. If you provide various goods or services, consider creating a clear breakdown for each item on your invoice. This will help your clients understand what they're paying for and reduce any confusion or disputes down the road.
Now that you have all the necessary information at your fingertips, it's time to unleash our inner design guru and create an invoice from the template. 📝💲
Creating an Invoice from the Pre-designed Template in Google Sheets
If you are in a hurry or don’t want to mess up with the invoice, we have good news for you! Google Sheets offers a range of pre-designed invoice templates that you can choose from. These templates are designed by professionals with a good eye for aesthetics and functionality. Take some time to explore the available options from our TheGoodocs.com platform and see which invoice template catches your eye.
When choosing a template, consider your business style and branding. You want your invoice to represent your company's personality and leave a positive impression on your clients. Whether you prefer a minimalist design or a more colorful layout, there is a template out there that suits your business style.
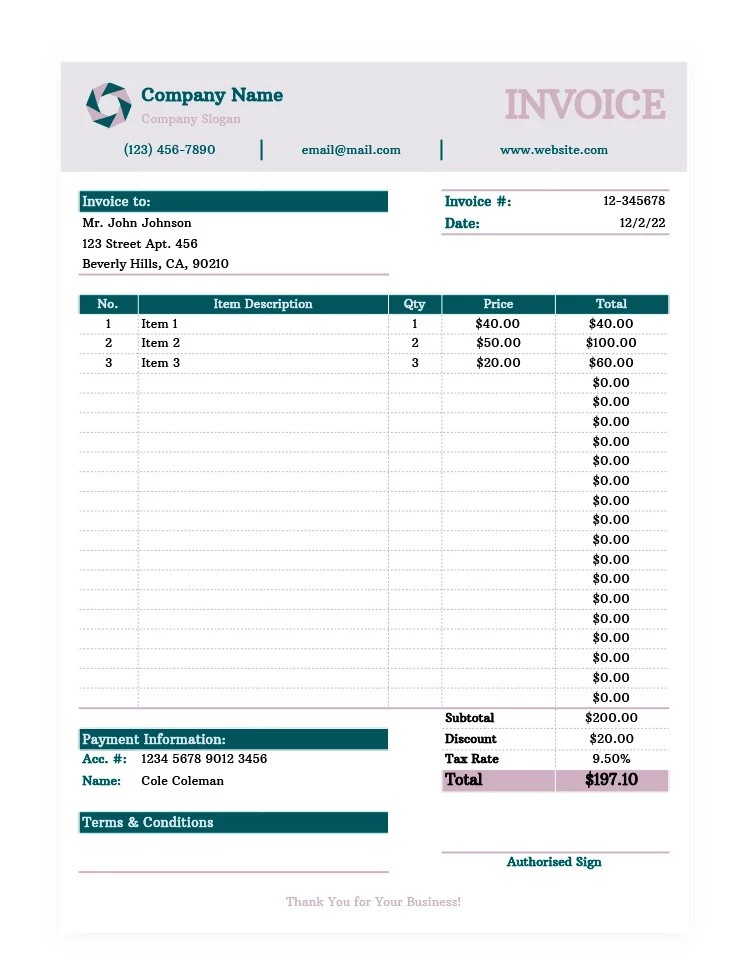
To guide you through, we have decided to choose a Green and Pink Invoice invoice template that won’t distract your eye from additional graphic elements or large tables. Our mission is to master and organize the main structure, add items, and prices, calculate subtotal and total amounts to be paid, and finally, save the invoice to send it to the client.
Step 1. Customizing the Header and Details
Once you've selected a template, it's time to make it your own. Customizing the template to suit your business needs is essential for creating a unique and personalized invoice. Start by modifying the header section. Add your company's logo, contact information, and any other relevant details. This will give your invoice a professional look and make it easy for clients to reach out to you.
As all text and elements in the template are customizable, you have to put the cursor to the text, remove existing information, and input your data.
The title of the document on the right should stay as it is – Invoice. It perfectly aligns with the layout and the light purple color makes it visible.
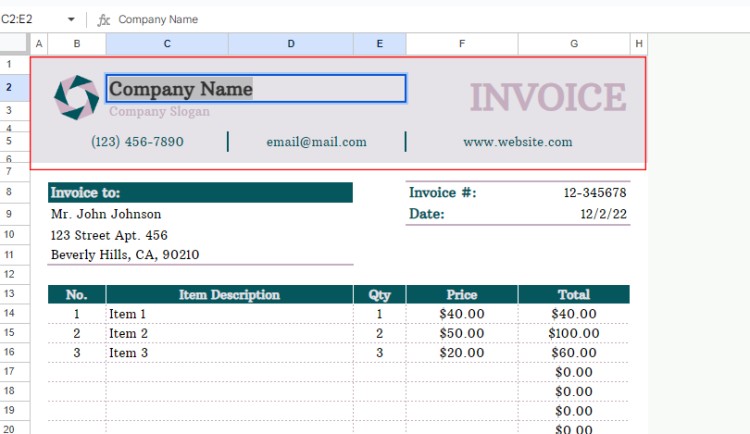
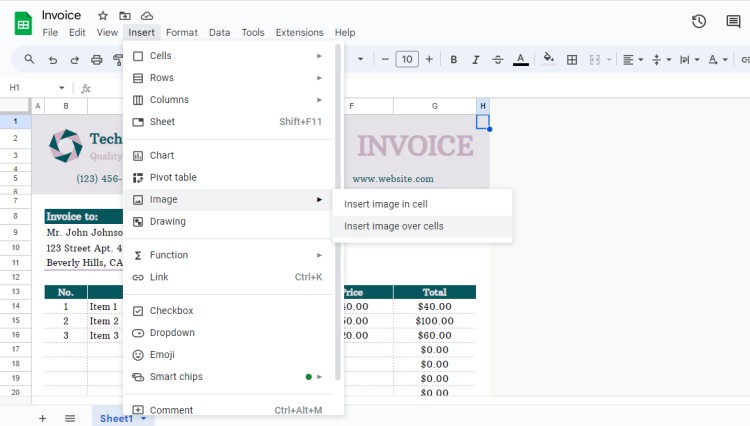
We have replaced the company name and slogan. We will leave the same logo, but you should insert the PNG. type of the business logo of your company by choosing Insert – Image – Insert Image over Cells. Transform the image to fit the necessary size by dragging the image corners.
Step 2. Adjusting the Color Scheme and Fonts
If you have chosen the template, where you like colors and professional fonts are amazing for you, skip this step.
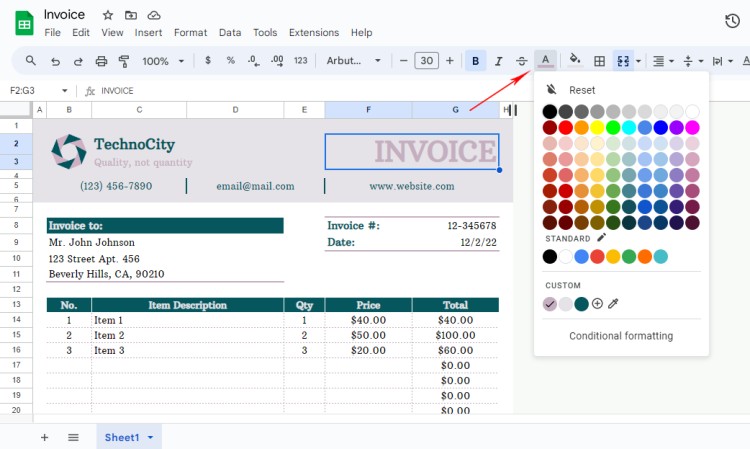
Yet, if you would like the invoice to match your company’s branding, consider adjusting the color scheme and fonts. Select colors that align with your business's visual identity and choose fonts that are easy to read but also reflect your style. But don’t overdo it.
To change colors, select the text and head to the toolbar Text color. You can also choose a font for the company’s name or for the invoice title, yet, we recommend keeping all text in one style.
Step 3. Including Client Information and Payment Terms
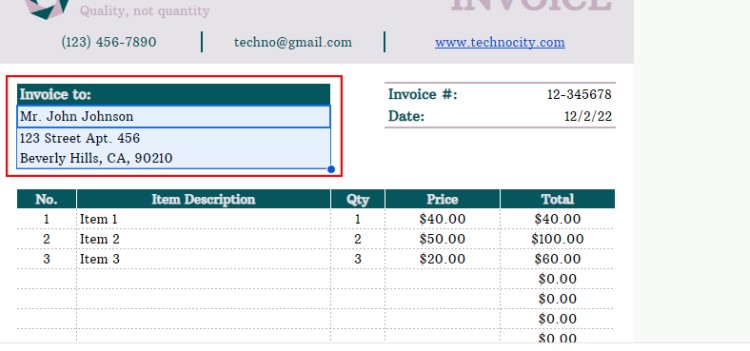
Next, include the client's information, such as their name, address, and contact details. Make sure to also include clear payment terms, such as the due date and preferred payment methods. This will help both you and your clients stay organized and avoid any confusion or delays in getting paid.
Step 4. Inputting Service/Product Description and Price
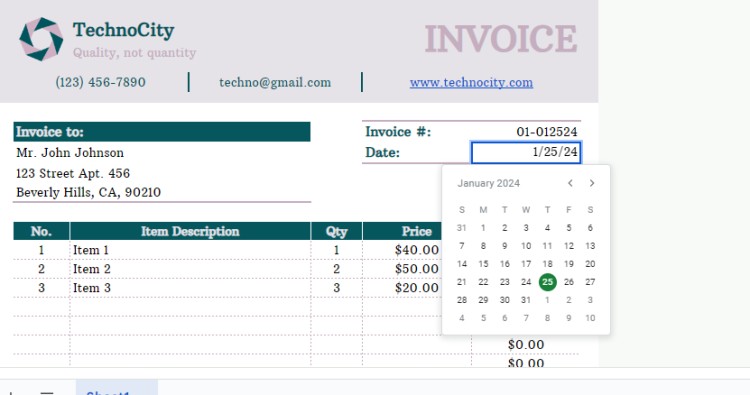
Before customizing the service description and price, let’s not forget that we should give a unique Invoice number acc. to your business workflow. If it’s your first invoice, think of the number containing an order number and “1” or “01” digits. For instance, Invoice #:01-012524 (where 012524 is the order date).
And here you can see an amazing benefit of a pre-designed template: it has a built-in calendar to fix the date!
Step 5. Modifying the Table Description
Here is the important part of invoice customization, where you need to be double attentive to get paid faster. Don’t mess up by issuing incorrect prices, and later explaining your to client about a mistype.
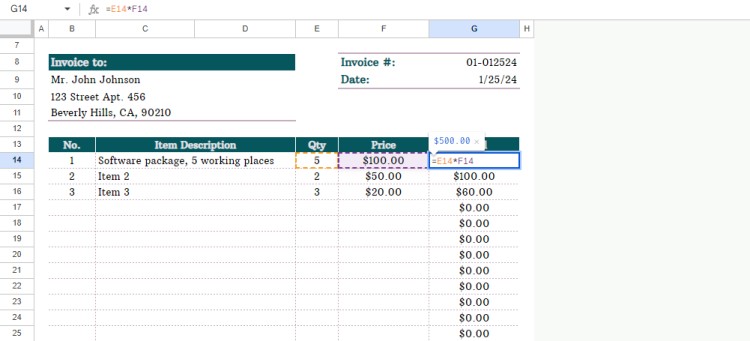
The beauty of the pre-designed template is in the built-in formulas that automatically count Total price per service, Subtotal, and Grand Total.
Let’s see how it works. We will type in the service description, put the Quantity as 5, add the price per service – USD 100, and the result is USD 500.
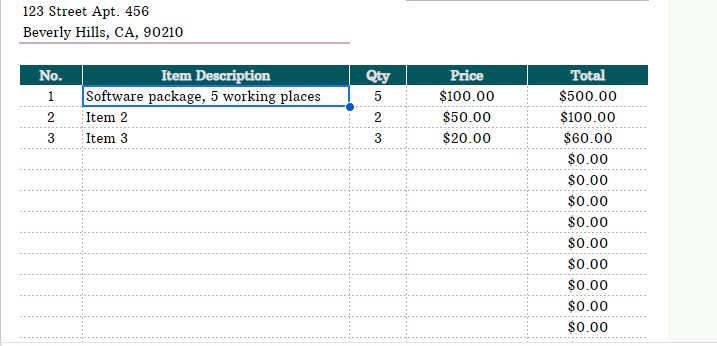
Here is the formula:
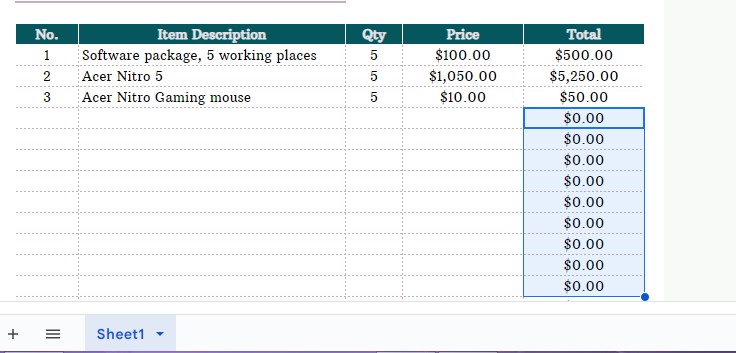
Continue to add product or service descriptions and input quantity and price. After you are done with indicating services, you may remove unnecessary $0.00 that are listed to count more services or items.
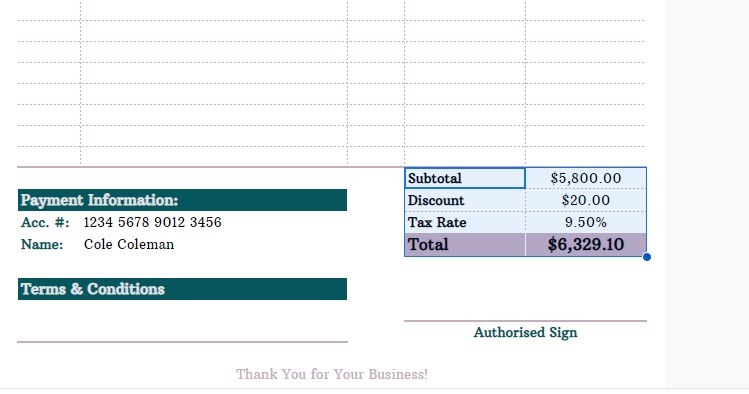
Finally, let’s see the Subtotal and Total amounts to be paid. Here, you will see a cell for Discount and Applicable Tax. Customize the cells accordingly.
Step 6. Adjusting Payment Conditions
Now you have your table customized, but how does the client should pay for it?
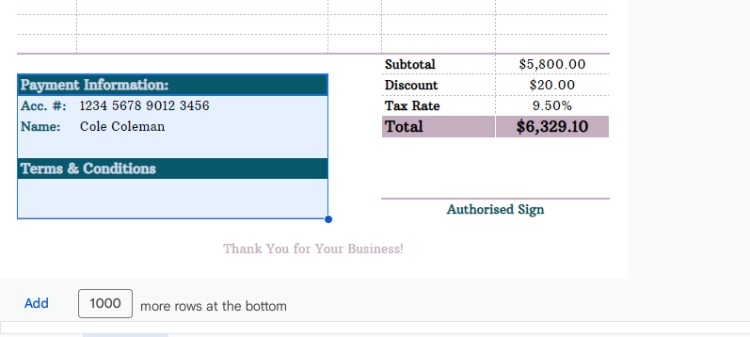
Here you need to indicate relevant payment details including Account number, SWIFT details, Bank details, or any other information you have from your bank.
Secondly, let the customer know how and until what date he should pay the bill: 100% prepayment or 20%prepayment 80% due on delivery.
Step 7. Saving and Sharing the Invoice with Your Clients
After you double-check the invoice, it’s time to send the invoice to your client. If the situation requires, you may send the digital invoice without the signature or print out the invoice, sign in, and scan the invoice.
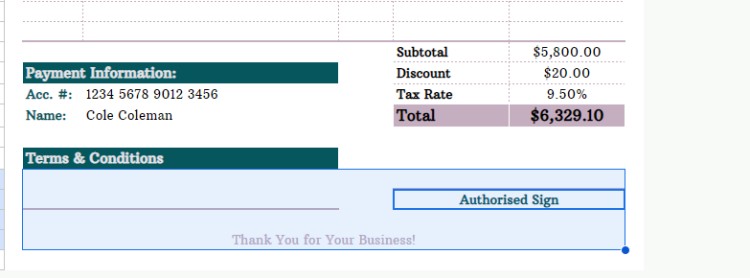
Don’t forget that it's essential to save your invoice somewhere safe and easily accessible. Google Drive is the perfect place for that! Simply click on "File" and select "Save" or use the shortcut Ctrl/Cmd + S.
You can create a dedicated folder to keep all your invoices organized, making it easier to locate them in the future.
And the last step - compose an email, attach the saved invoice in the necessary format file, and address it to your client.
Congratulations, we’ve made an invoice with the help of a template in Google Sheets!
Additional Tips for Creating Invoices in Google Sheets
But that’s not all! We would like to give you additional tips to finalize the invoice creation. By following these tips, you can create professional invoices that effectively communicate transaction details and facilitate prompt payment.
- Choose the template from TheGoodocs according to your business idea
We recommend choosing a suitable template for your invoice. Google Sheets offers a variety of invoice templates that you can customize to meet your specific needs. Select a template that aligns with your brand's image and includes all the necessary information, such as your name or company name, address, contact details, and logo. Keeping your invoice template consistent with your brand identity will help maintain a professional appearance across your business communications.
- Keep your invoice design clean and error-free
A second tip is to keep your invoice design clean and straightforward. Avoid overcrowding the invoice with excessive details or unnecessary fields that may confuse the client. Use appropriate fonts, font sizes, and colors that are easy to read. Remember, the main purpose of an invoice is to clearly communicate the transaction details and facilitate prompt payment, so prioritize clarity over elaborate design.
- Utilizing formulas and functions for automated calculations
Google Sheets has a bunch of powerful formulas and functions that can turn you into an invoicing wizard. Use SUM() to estimate numbers, IF() to apply conditions, and VLOOKUP() to fetch data. Embrace these tools to automate your calculations and save yourself from headache-inducing manual work.
- Saving and organizing your invoices in Google Drive
You don't want your invoices to get lost in the digital jungle. Keep them safe, organized, and easily accessible by saving them in Google Drive. Create a dedicated folder for your invoices or use labels to make searching a breeze. Plus, with everything stored in the cloud, you won't have to worry about losing important documents.
Creating invoices in Google Sheets offers numerous benefits, including ease of use, customization options, and the ability to automate calculations. By following the steps outlined in this article, you can create professional invoices that reflect your brand, provide clear information to your clients, and simplify your financial tracking.
Remember to follow our tutorials for more excellent skills in creating custom invoices in Google Sheets and Google Docs, and share the page with your friends and colleagues to check out free invoice templates! Have fun designing your invoices and simplifying your billing process with these handy techniques!

We are a team of creative people who dream of sharing knowledge and making your work and study easier. Our team of professional designers prepares unique free templates. We create handy template descriptions for you to help you choose the most suitable one. On our blog, you'll find step-by-step tutorials on how to use Google Products. And our YouTube channel will show you all the ins and outs of Google products with examples.


