How to Make Google Docs Survey?
Google Forms are commonly used for quick and easy collection of some data in the format of the survey, usually with a large group of people. And a very nice thing about it is that it’s made like a builder where you create sections representing different types of data requests for people to enter.
Watch the video from https://thegoodocs.com/ and learn How to Make a Google Survey:
How to Start Creating a Survey in Google Forms?
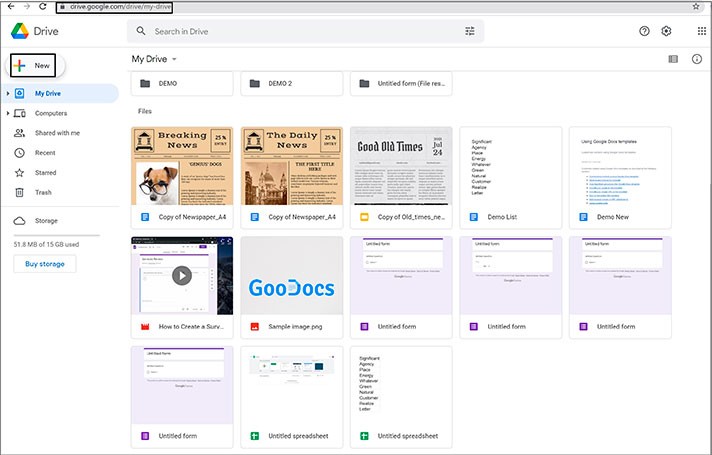
- Open your Drive and press the + New button in the left top corner of the page
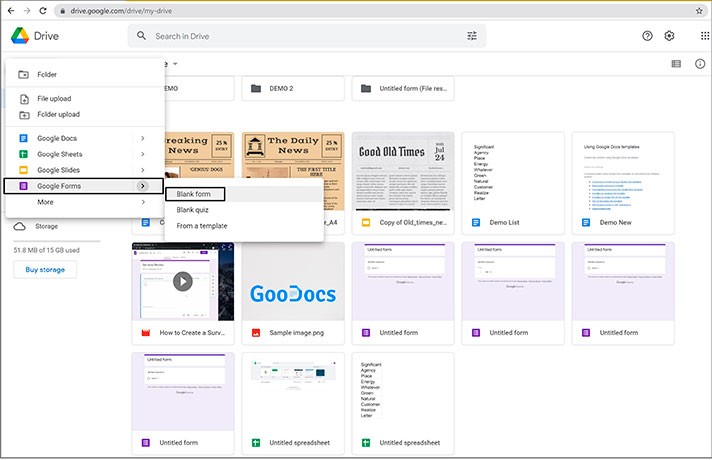
- Select Google Forms. And we press a small arrow and choose Blank form. There are other options, for example, Blank quiz or From a template (there are Google templates that may be helpful when creating a Google Form)
- First off, the basics. When you just enter the survey form, you have 2 sections to begin with: the title with description and the form to create the first question
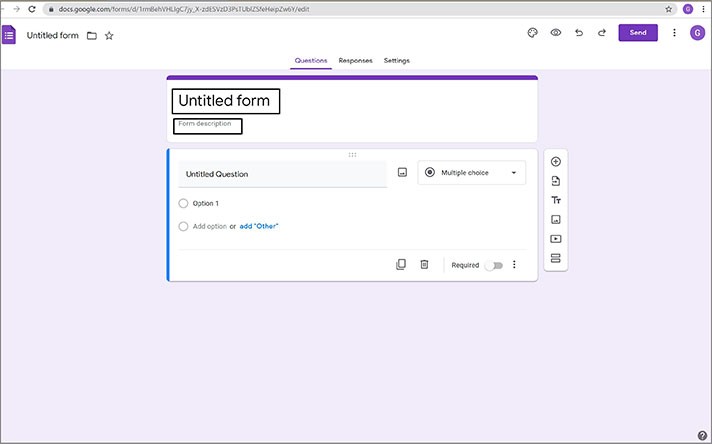
- First up, let’s name our questionnaire, which will be just a common poll for services review. Let it be Services Review. And the second field is the description which can expand and get really big, depending on the entered data. And let us expand it with a little description. Now we move on to the first question form created automatically
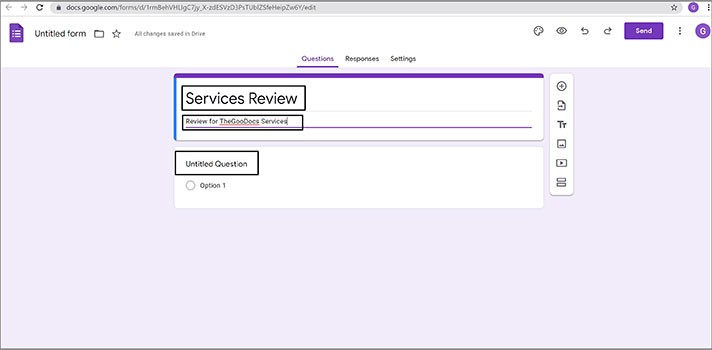
Creating Question 1
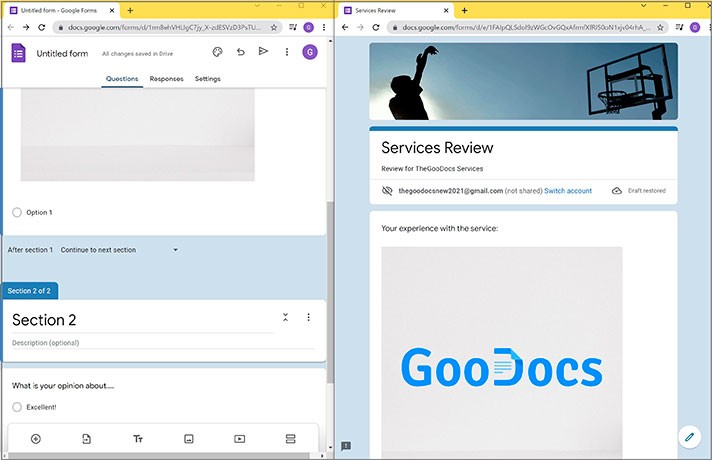
While editing our Google Form, we will show you the changes in real-time and how the survey will look to the respondent. In fact, for that, we will split our screen into 2 parts where the left is our form editing workspace, and the right part of the screen is how the viewer will see it. We think it will be really helpful.
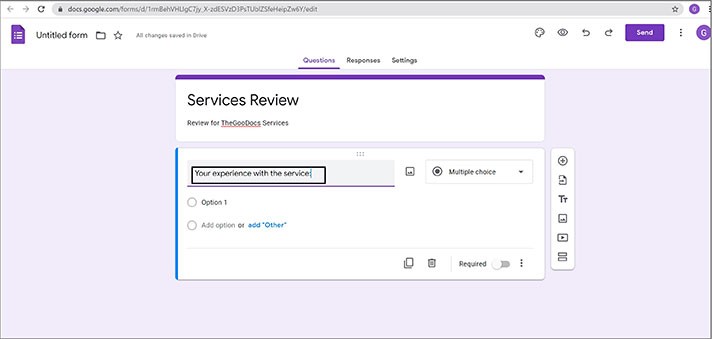
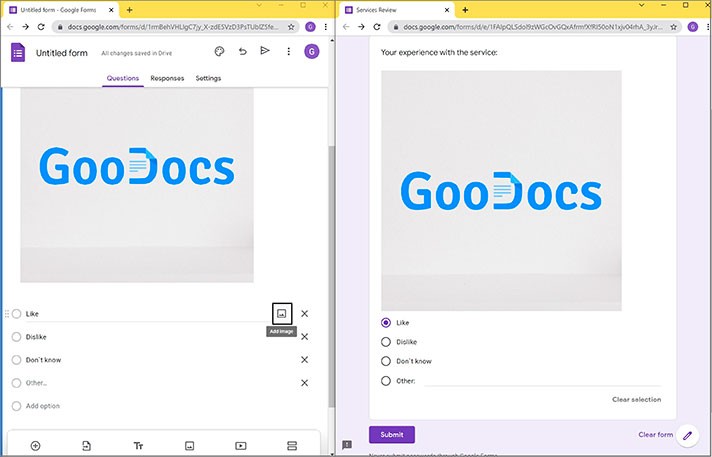
- And then next to it, there’s a picture upload button. So, you can attach a picture to almost every element here in the survey. And let’s do it
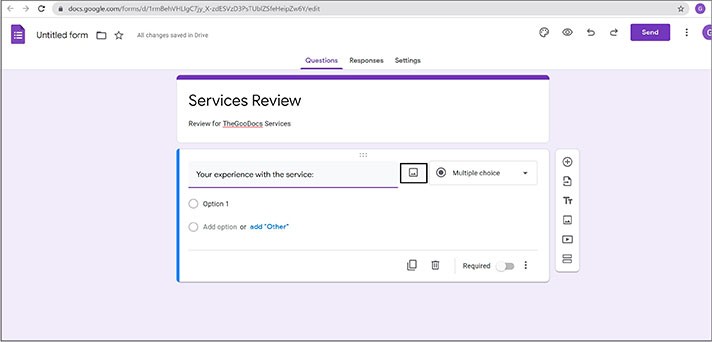
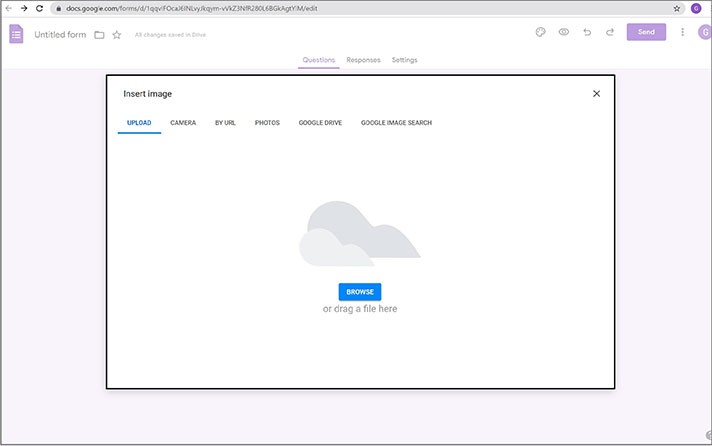
- Press on this icon, and here in the menu, select the source from which you will upload the picture
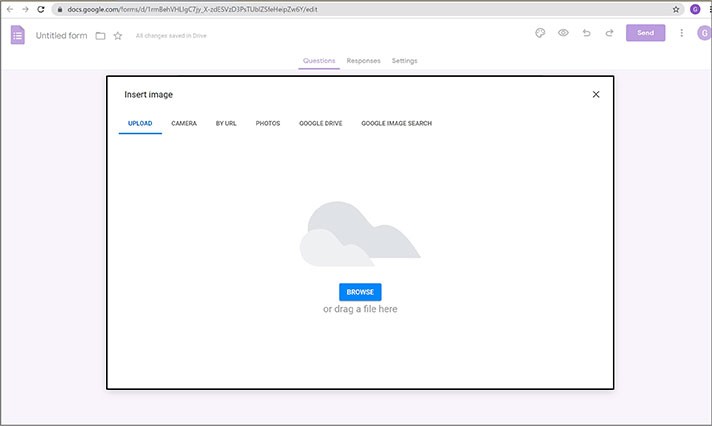
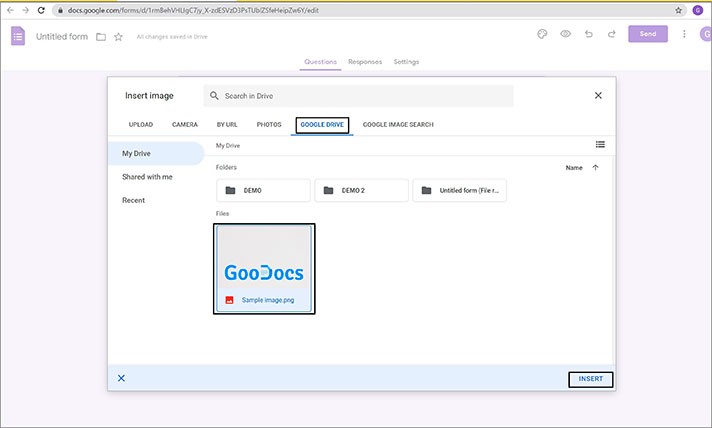
- We`re going to just upload the image from the Google Drive. There we go. We have here a logo of TheGooDocs. We select the image and press Insert
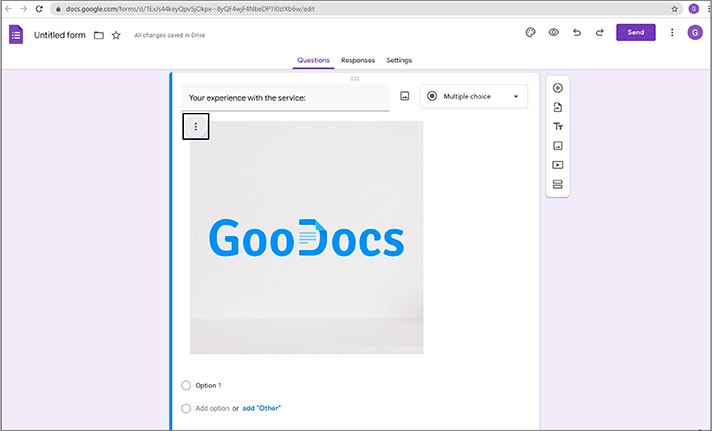
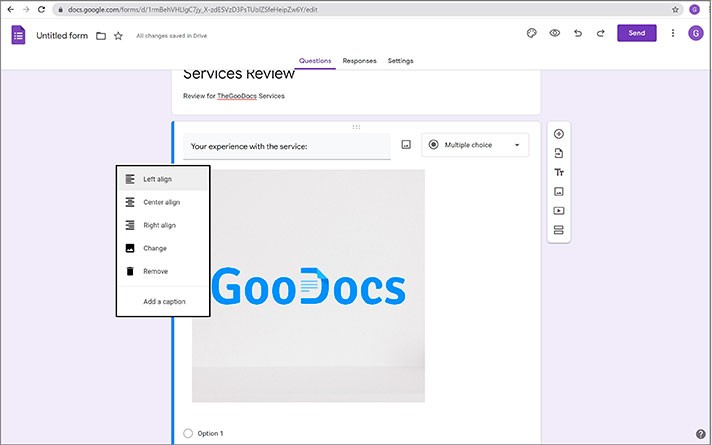
- Moreover, you can change the location format of the picture by pressing the button with three vertical dots and selecting the options you need
Short Answer & Paragraph
- Then, next to the image upload button, there’s a menu that we open up. And all these items are the types of how the answer form will look to the person
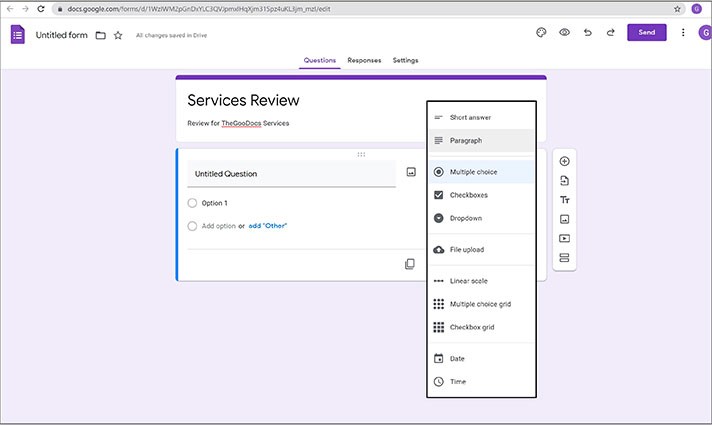
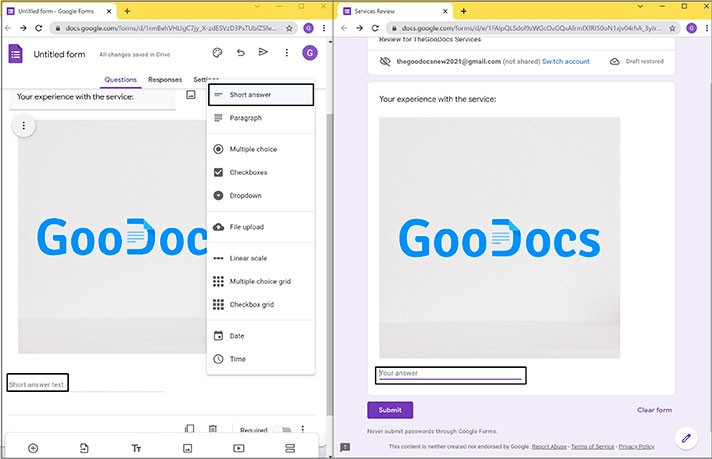
- Let’s review each one starting from the Short answer that you already have here from the start. This is simply a short answer field assuming the text that can be fitted in this line. And on the right, it is how it looks for a respondent
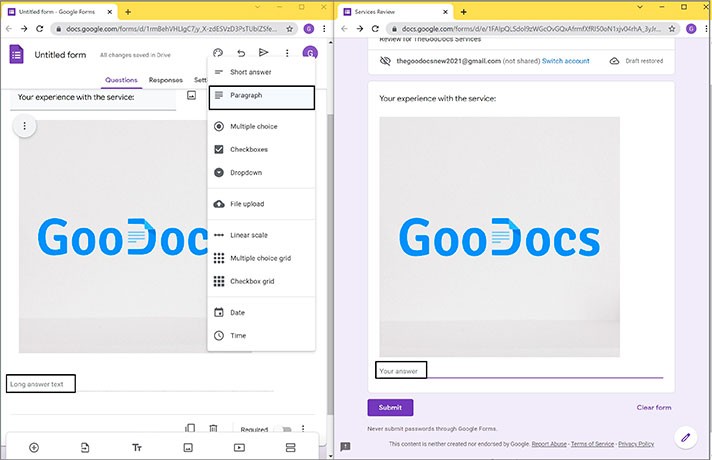
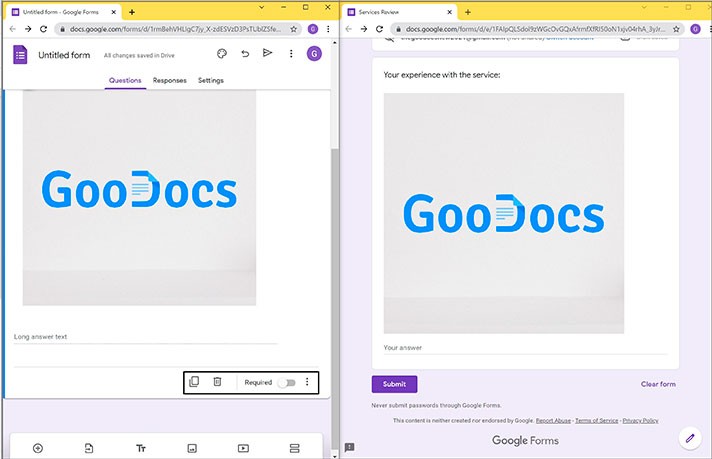
- And continuing, not far from the previous short one, back to the selection, we have Paragraph that is the same but means just a longer answer. Here's how it looks for a respondent. The answer line just increased a bit
Multiple Choice & Checkboxes
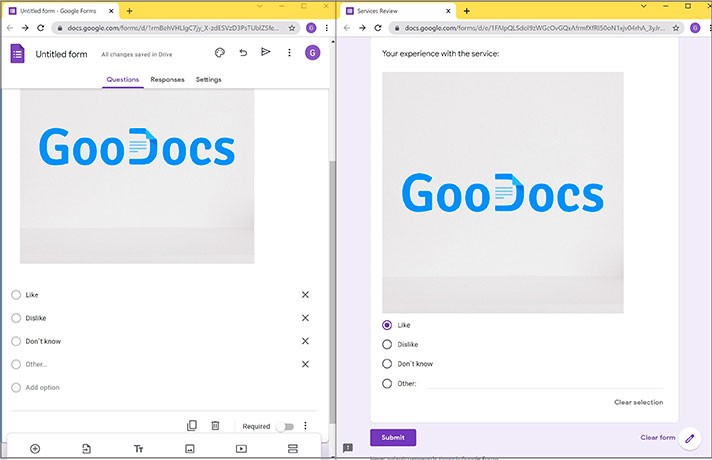
- Now let us show you Multiple choice where a person can select only one item amongst the others, and it will then get permanent
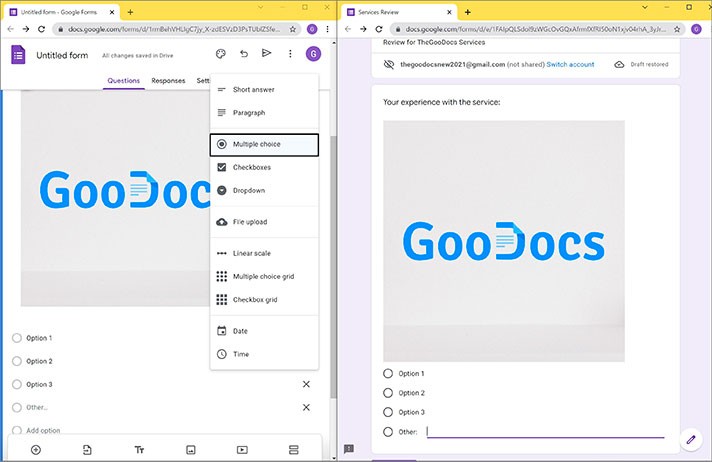
- So, it will be Like, Dislike, and Don’t know. And then there’s an option to add the “Other” field. Let’s press it. This is where a person can reply with a text if he/she thinks that no answer suits him/her. Now, as respondents, we can select either of these three options: like it’s a checkbox. Or we can reply with text in the “Other” field
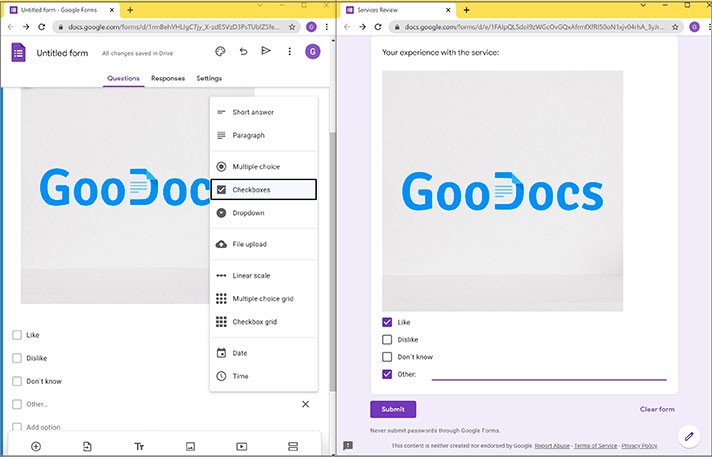
- Now moving on to Checkboxes which is almost the same but just looks more of a survey type. Although, here, the person can select multiple items as an answer. Let us update it. And this is how the respondent will see it. The same checkboxes, but we can select multiple answers and the “Other” field. So, a person can enter a custom answer
Dropdown
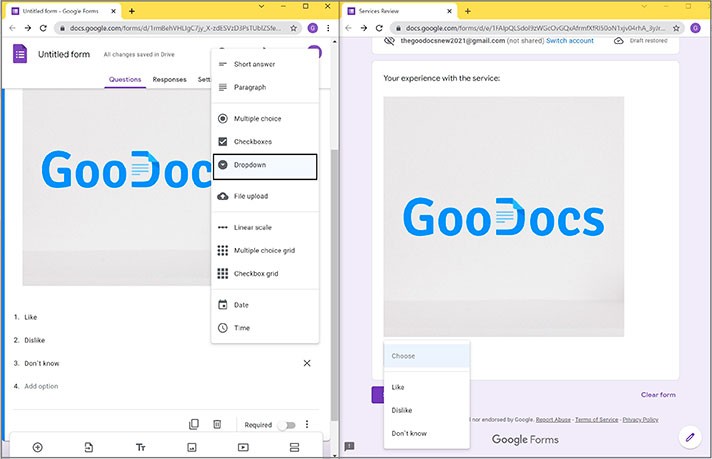
- Now let’s switch it to the Dropdown option, which unfolds once you press it. And this is actually the same as multiple choice, where a person can choose only a single option but with no “Other” field. The difference, though, is in the displaying type, which just makes the form look smaller. And here’s how it looks in the end. It is a very small form with just a single field
File Upload Request
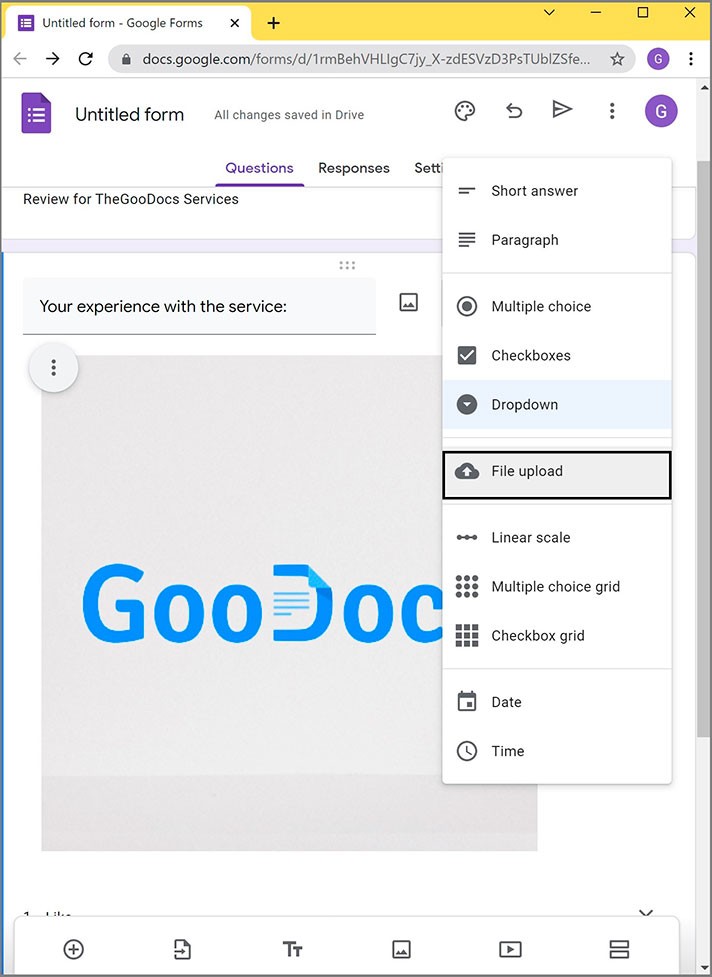
- Okay. Then we have such a thing as File upload, which is, more specifically, a file upload to the Form owner’s Google Drive. And this option is available only for signed-in to Google users
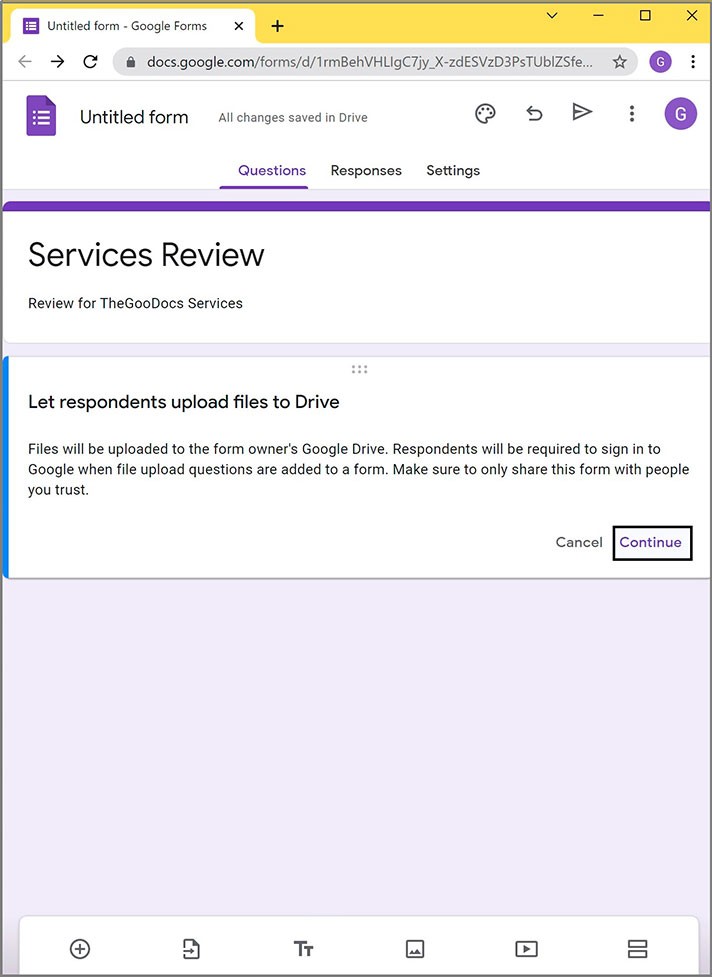
- So, let’s press Continue. And here, it allows us to set permissions for the file format where you can select the specific file types. As you can see, you can define which file formats are allowed, the number of files per user, and the maximum file size. Via the link View folder, you can go straight to the upload destination folder on your Drive. Now here’s also how it looks from the interviewee`s point of view. And here, we`re going to emphasize that this option is available to only signed in to Google users. So, we got here a single Add file button that we press on
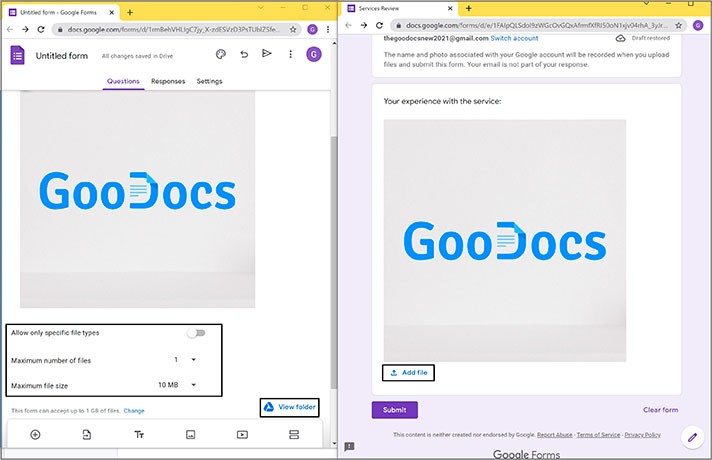
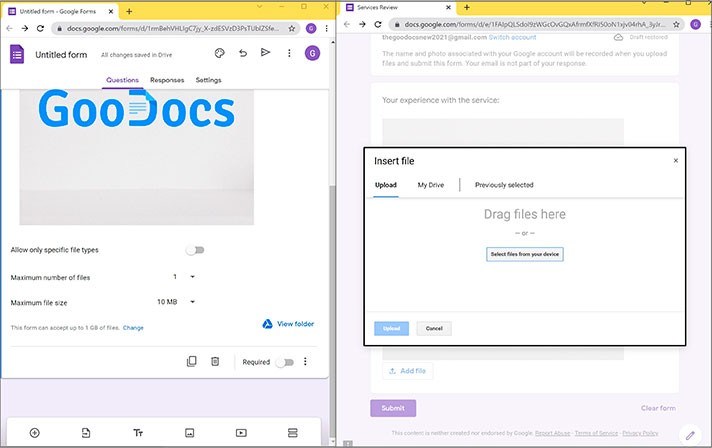
- And here, you can select the upload method, which is from either a computer or from the Google Drive. Moreover, you can choose from Previously selected files if needed. And click Upload
Linear Scale
- Now opening the selection menu again and moving on to the Linear scale item. And the Linear scale option is commonly used to let people rate something
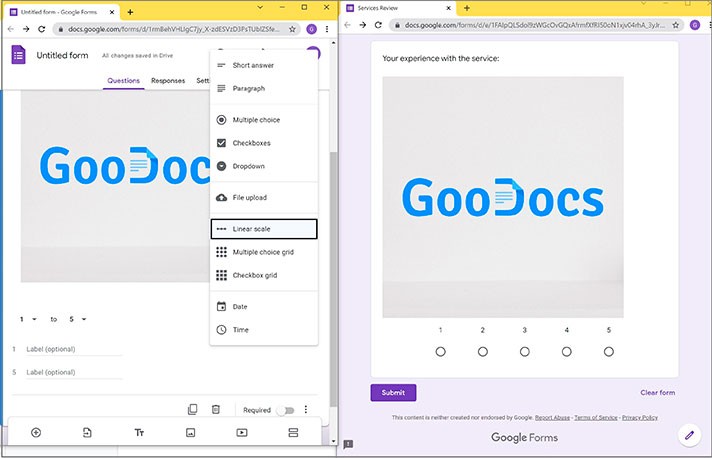
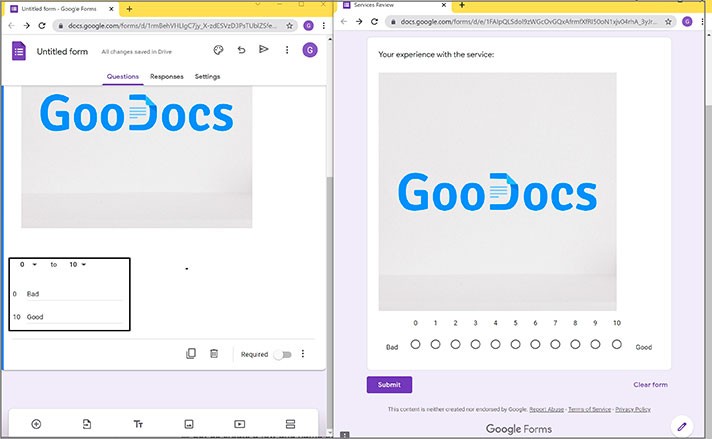
- Like “On a scale from 1 to 10, how much did you like our services?”. And here, you can select the number of items from 0 to 10 maximum. Of course, set the start and endpoints. Like Bad and Good, which will allow people to rate your services from bad (0) to brilliant (10), for example. Let us update. And now it looks just like we expected it to look
Multiple Choice Grid
- Next up in the selection, we have a Multiple choice grid option which is similar to the Linear scale. Only that now there are multiple rows unlike with single only with the Linear scale
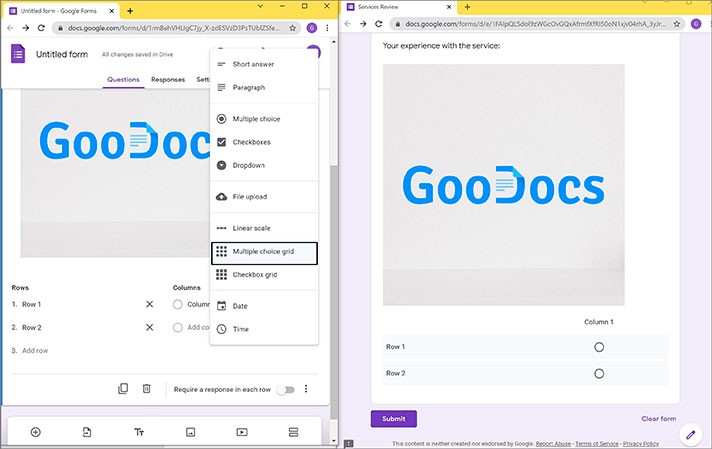
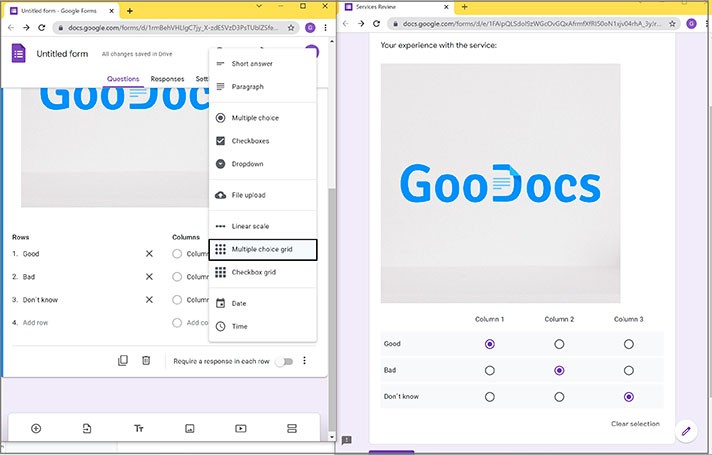
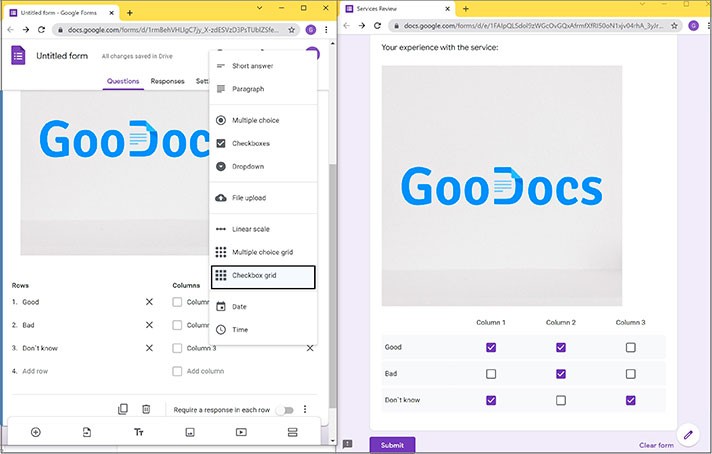
- Let us create a few and name the columns with Good, Bad, and Don’t know. And on the right, we are updating the view for the respondent. So, yes, this is a grid with rows and columns. In rows, we ask questions. In columns, we suggest short replies. The person can select only 1 item per 1 row. And the column count will depend on how many options you offer
Checkbox Grid
- Back to the selection. Then it’s Checkbox grid, where, of course, similar to the Checkbox item before, among the offered answers, a person can select a few at once. Let us update it
Date and Time
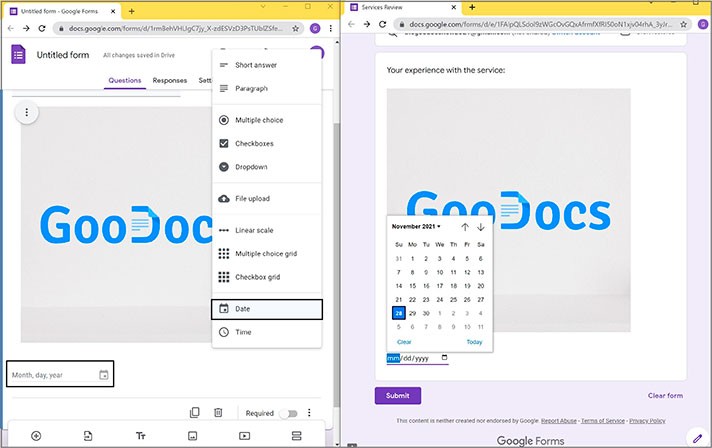
- And on the right, we just select a few ones. And then it’s even simpler. We select the Date option asking the person to enter the required date
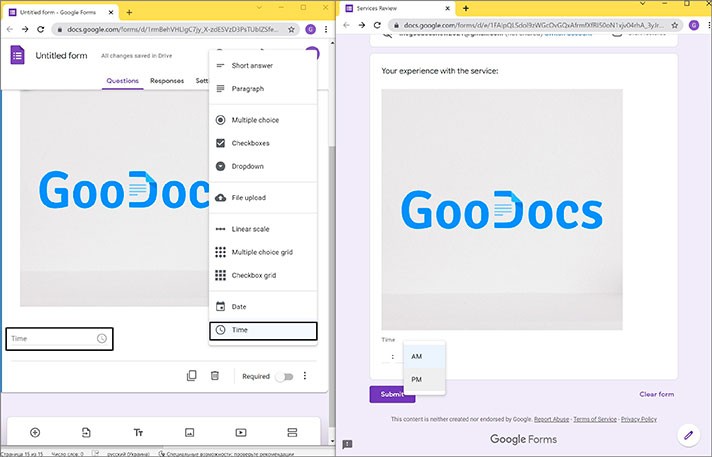
- And the next one is the Time option. Now let us update it and show you. So, we can see here two items where you enter the appropriate time
Form Layout & Controls
- And that’s it for questions. Now a bit about the form layout and its controls. On the right, you have the controls menu. We are going to look at them from top to bottom
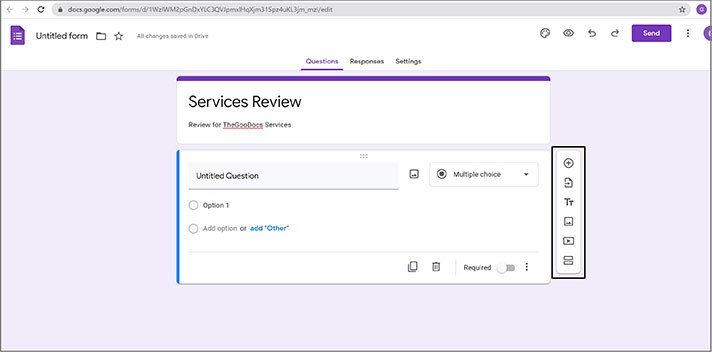
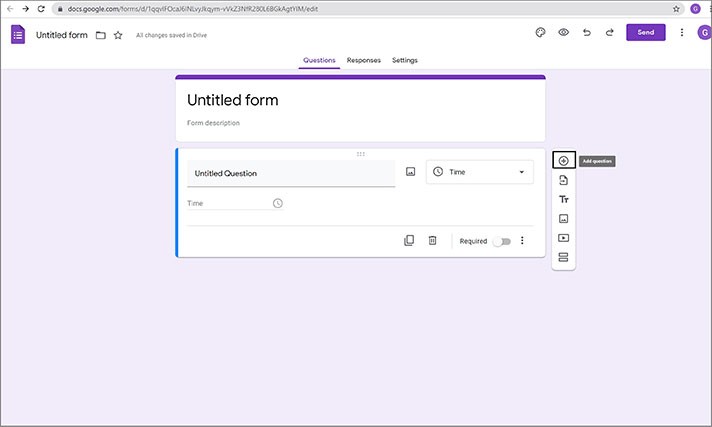
- Add question that adds one more question form
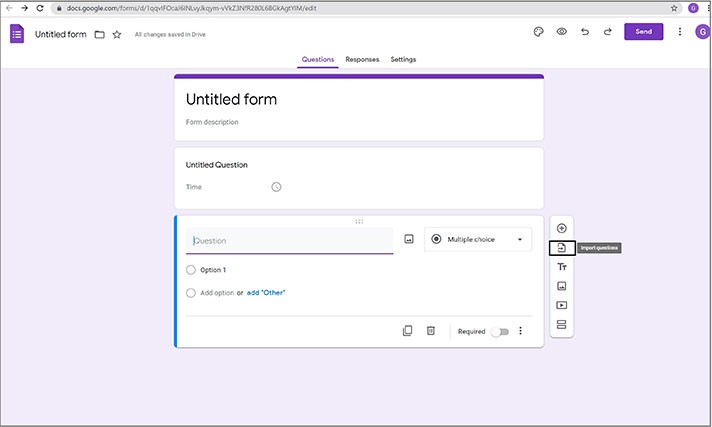
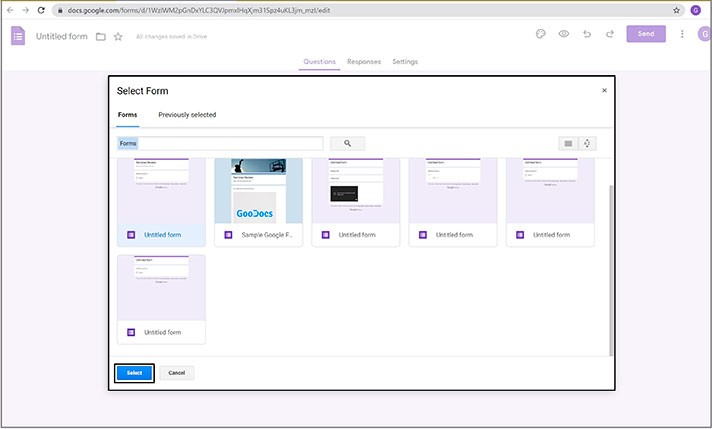
- Then it’s Import questions meaning importing them from another Google Form created earlier. Here you choose what you need and press Select. Let us close it now
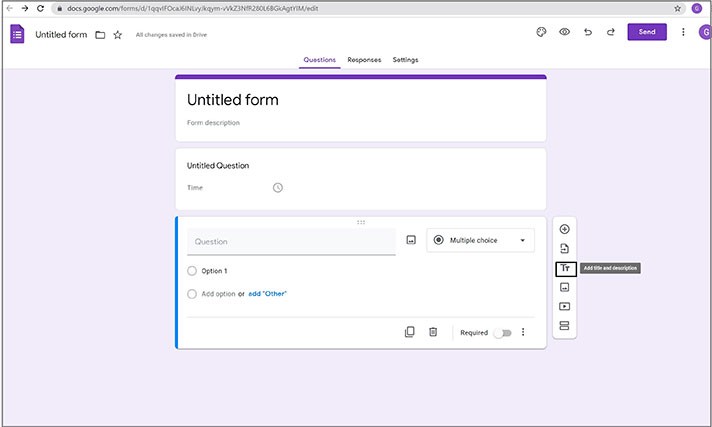
- And then it’s Add title and description when you want to separate questions into different sections, to touch on multiple topics in a single form where each section has its own name and its unique questions
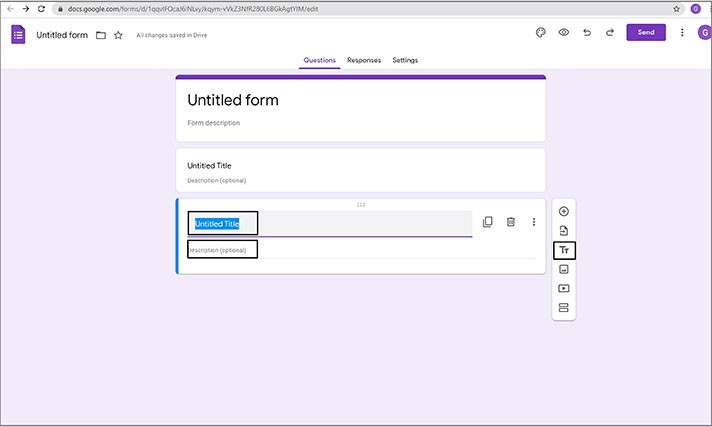
- Back to the controls menu. Add image. We can just make an image block with no question. Just an image with a title to customize the form in some way, or maybe you present your material in the form of an image
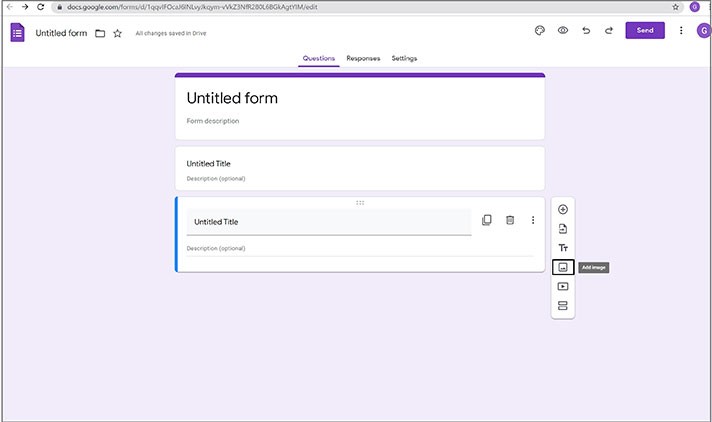
- Then on the menu, we can add a video block. Add video
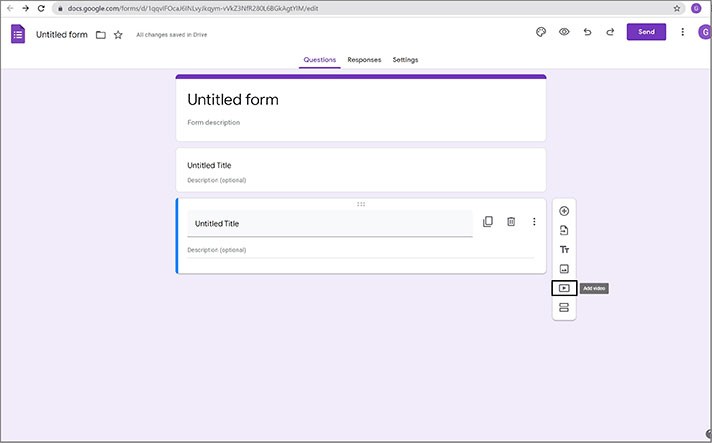
- It will open up like this. And here, you either search for a video on YouTube or paste the link to that video on YouTube. For instance, here’s ours, and we press Select here to confirm. Then we can name it, choose the location format by pressing three vertical dots, etc.
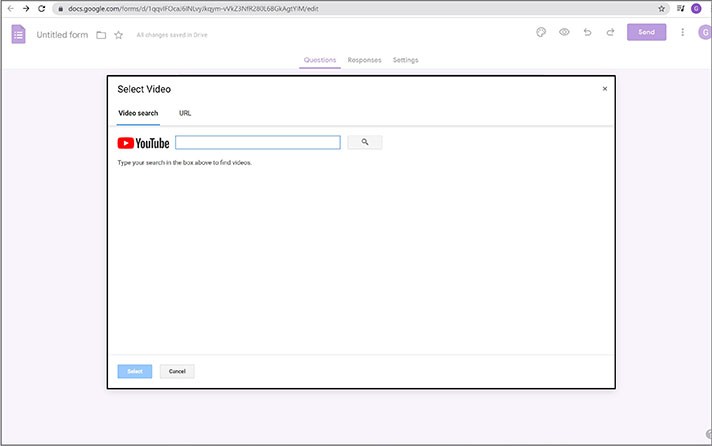
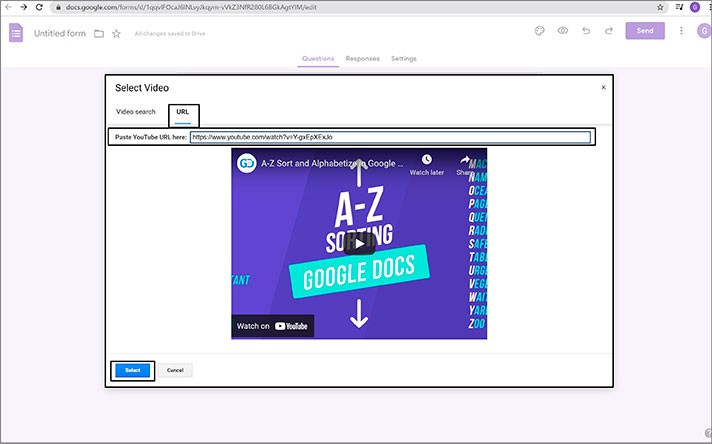
- So that a person can watch it right here in the Form
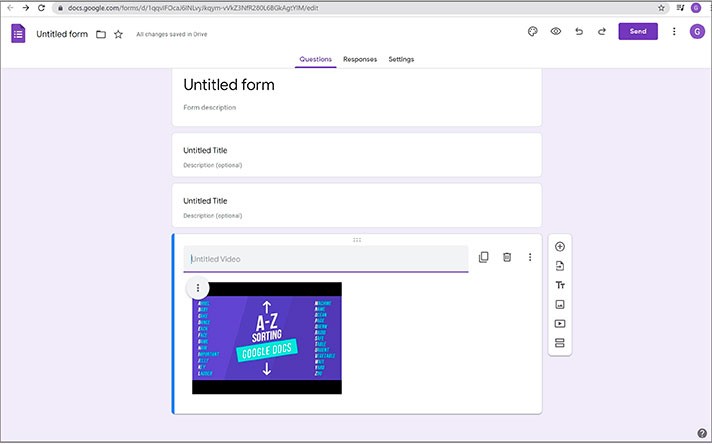
- And the last one in the selection is the Add Section button which literally creates one more page in the form
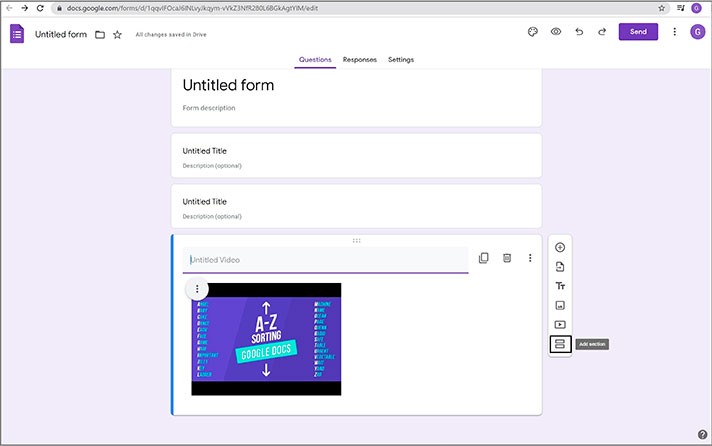
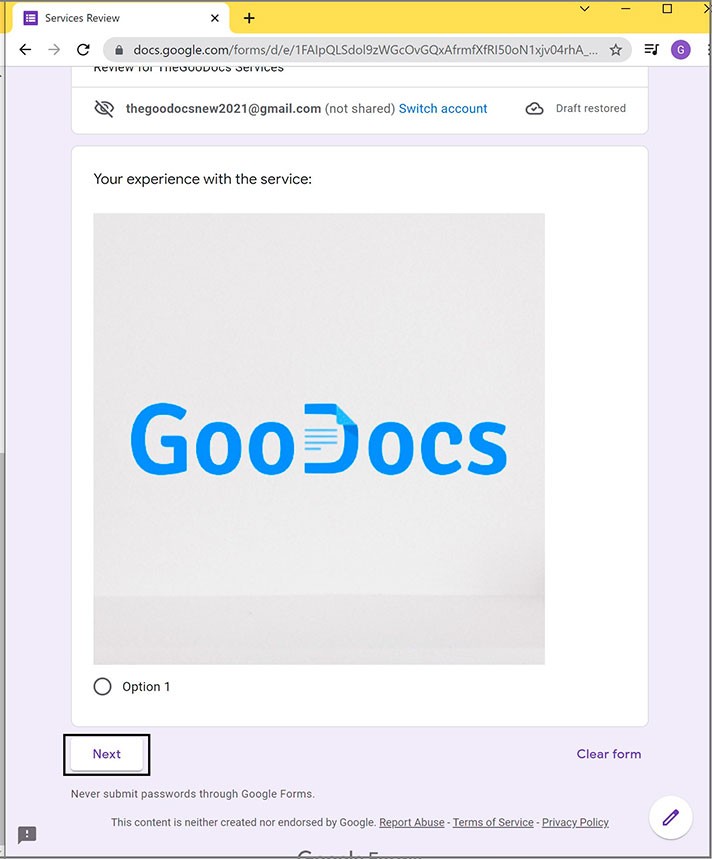
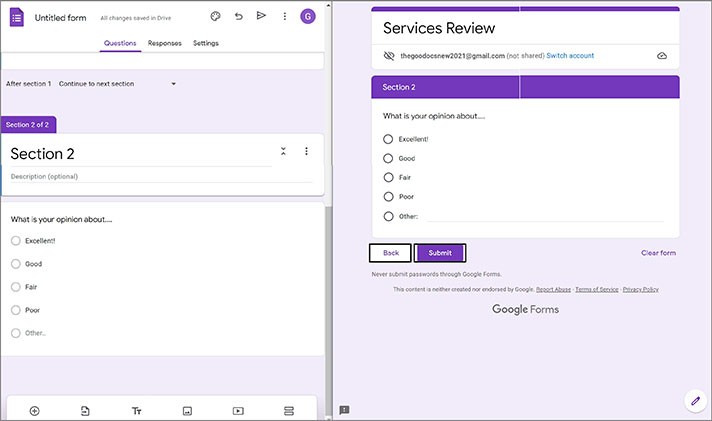
- Let us press it. And this is the page break itself. Like in a regular Google Document. Let us update the form for a respondent and show you how it looks. So, now the content is divided into 2 pages, and here’s the Next button to turn the page. You can see the second part here. And the Back and Submit buttons. The Add section option is really comfortable, allowing us to separate 1 type of data from another and turn it into something like an interactive document
Customization
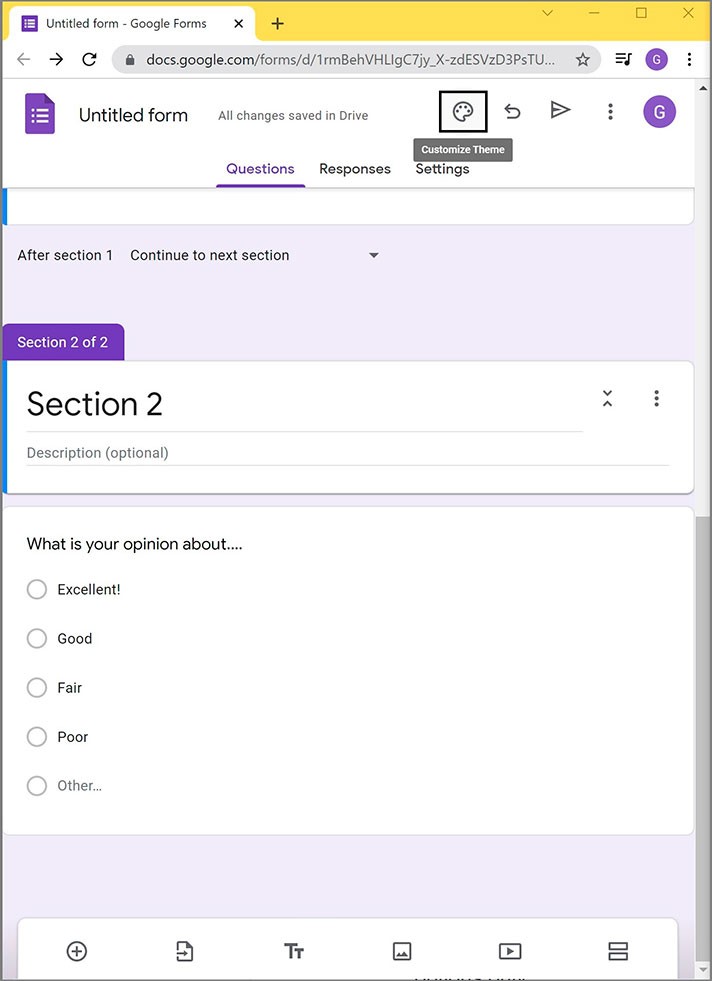
- A bit of customization now. Concerning the color scheme, you go up to the toolbar on top and press Customize Theme
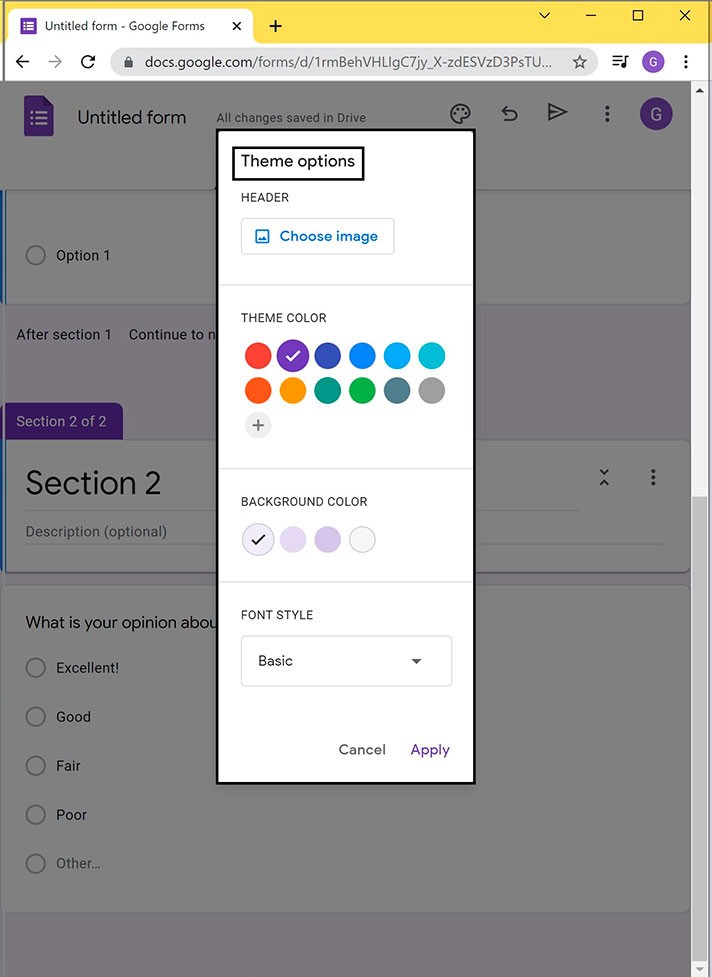
- Here are your options. For example, we are going to customize the HEADER picture
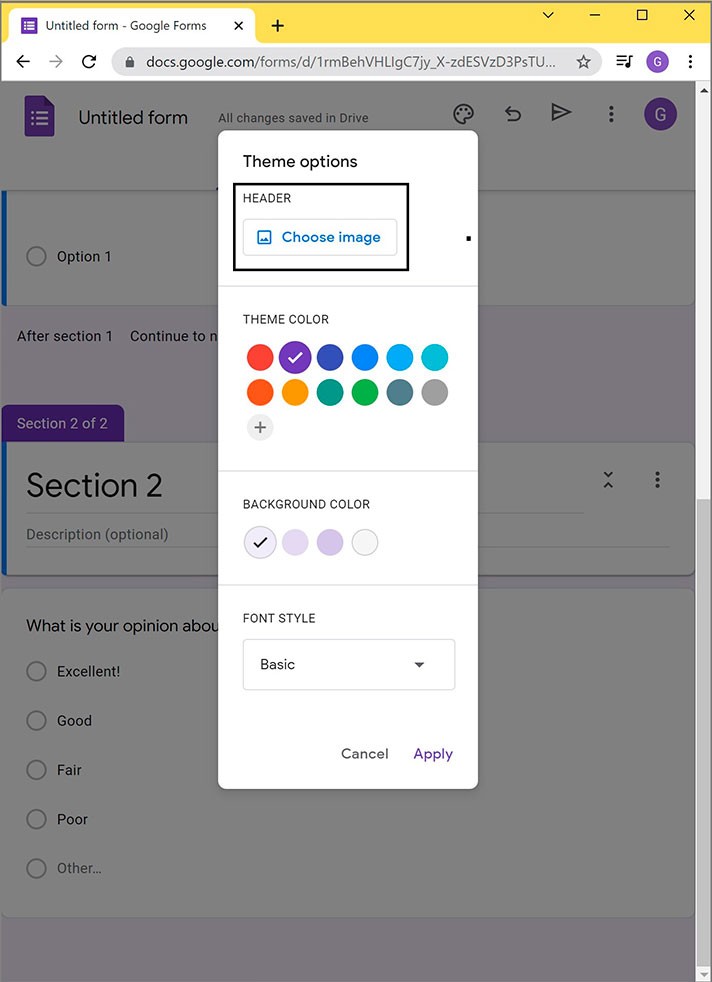
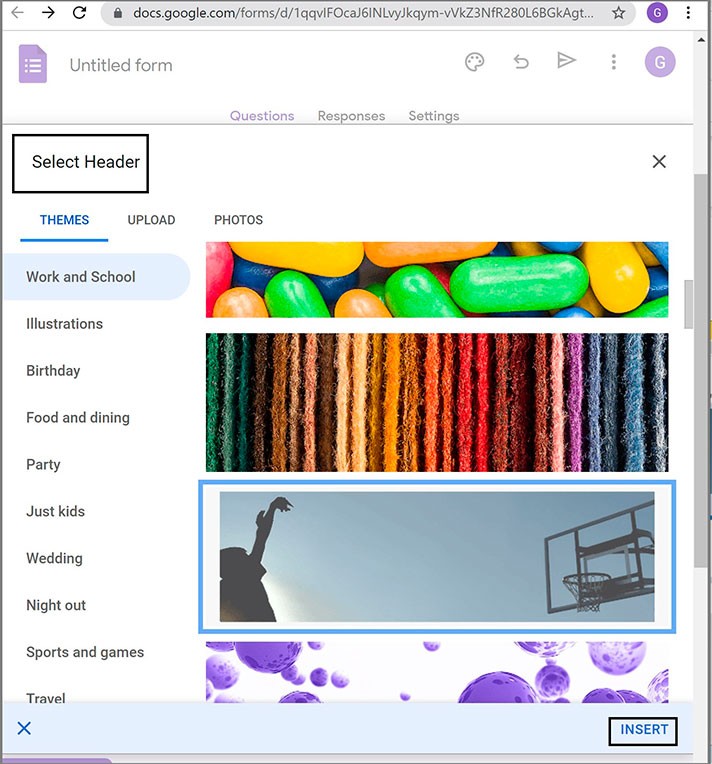
- You can select from what Google offers or upload something yours. We’ll go with some random one just to demonstrate. Press INSERT
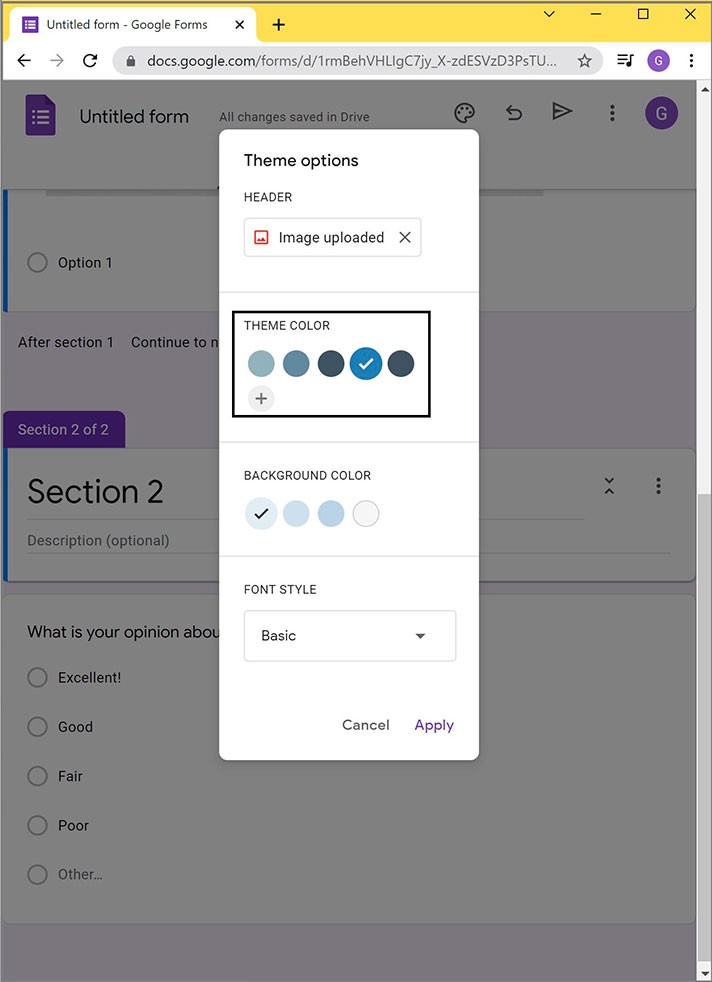
- Then on the right, it`s the THEME COLOR, an outline color of all these blocks. You can see how it changes
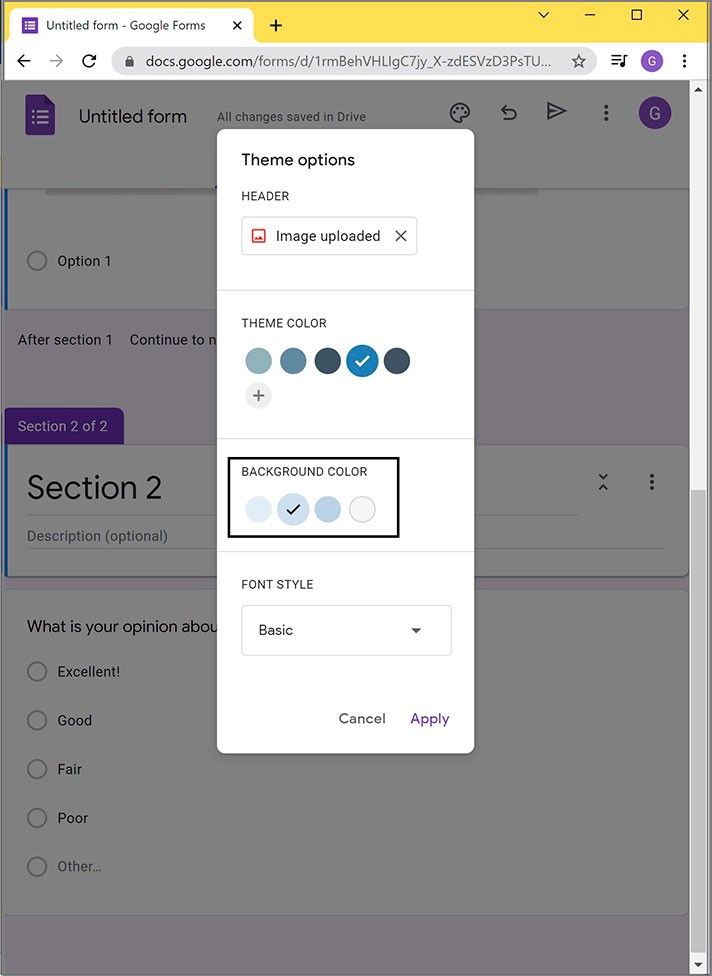
- Then the BACKGROUND COLOR allows us to choose from 4 options only
- And the FONT STYLE for the entire survey with only 4 options again. Google Forms are not really about much customization
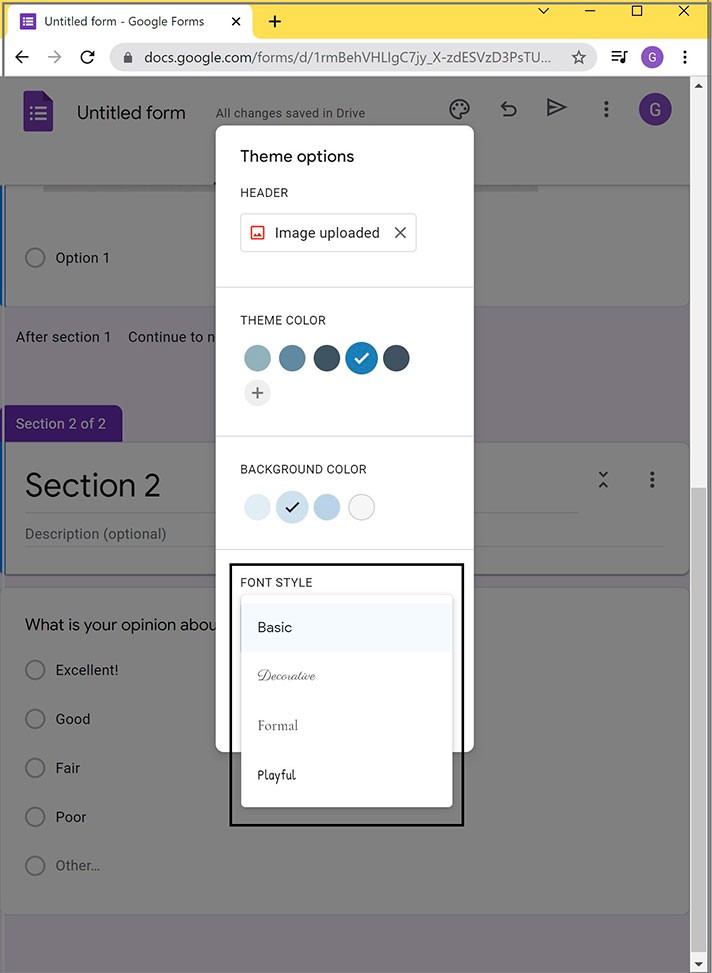
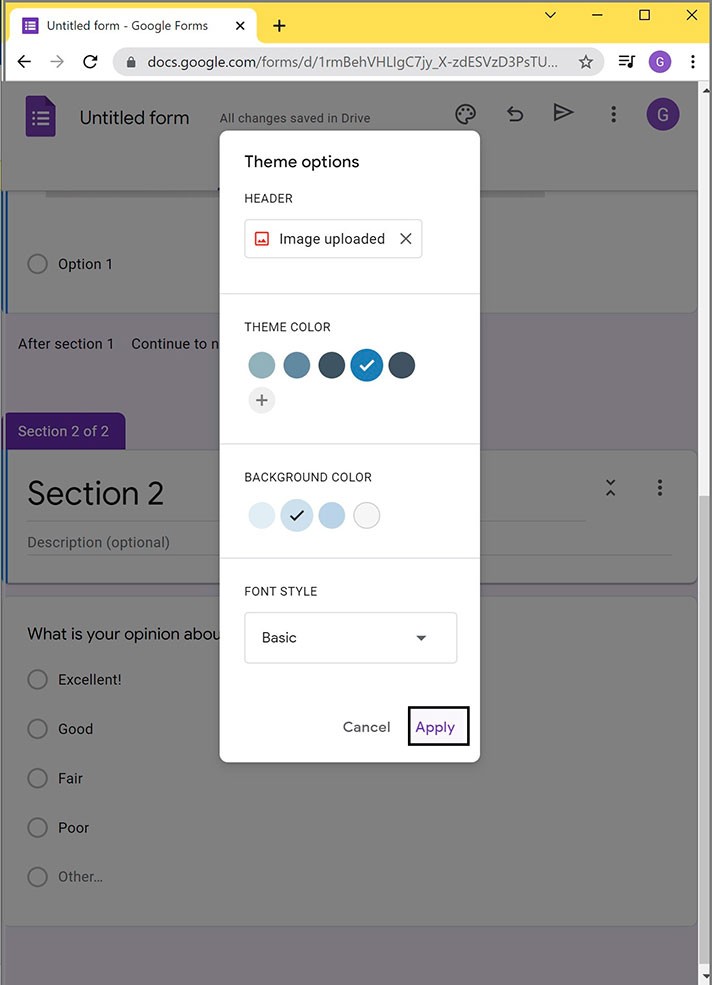
- We press Apply
- And now you can see how our sample customization looks like
Preview & Sharing
- Alright. We’re good with editing the form, and now we want to preview it before sharing it. For that, we press this “eye” icon on the top right here
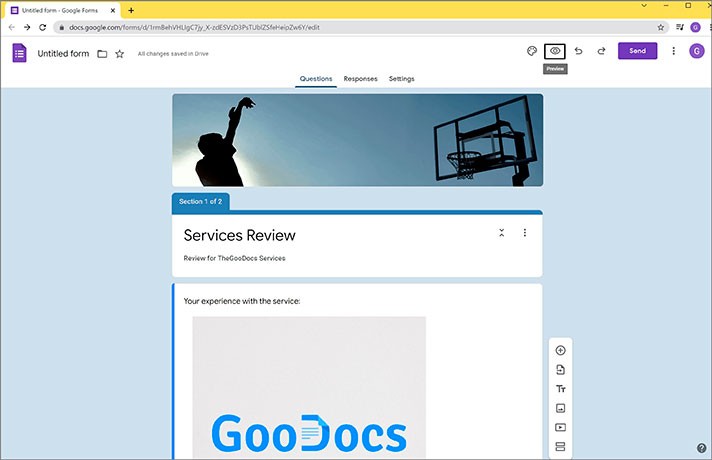
- It opens a new page, and here you literally see it from the point of view of the respondent, just how the person will see it, which is a really handy feature
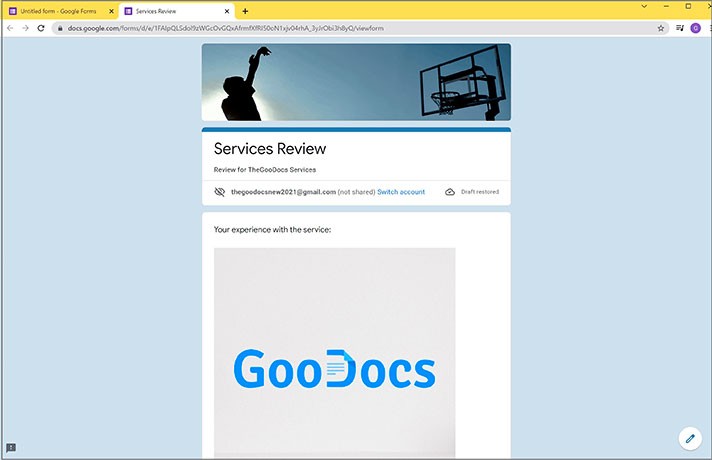
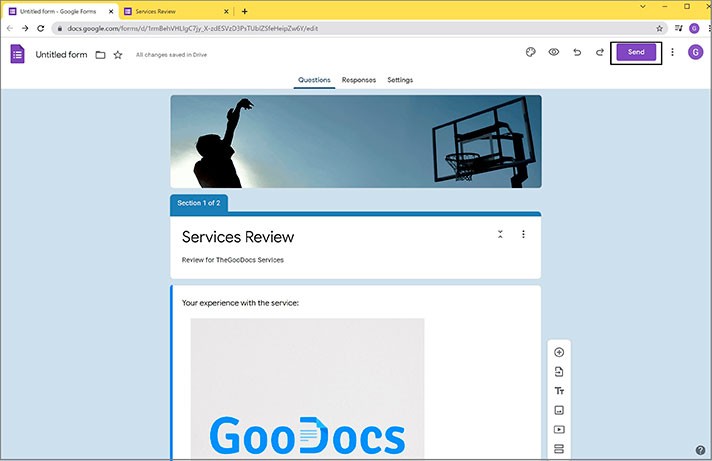
- And now it’s finally time to share our survey. So, if we watch the preview, we return to our working area. And then we press this really prominent Send button in the top right corner
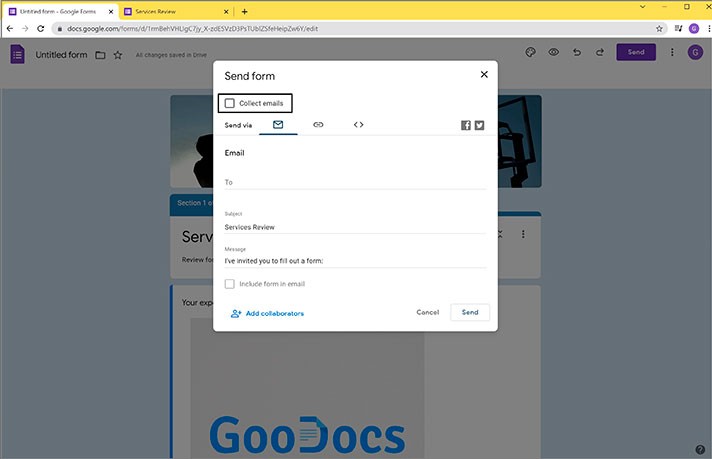
- And here’s the sharing menu. This button (Collect emails) will oblige every respondent to enter his/her email address. And if you don’t check it, this form may stay anonymous
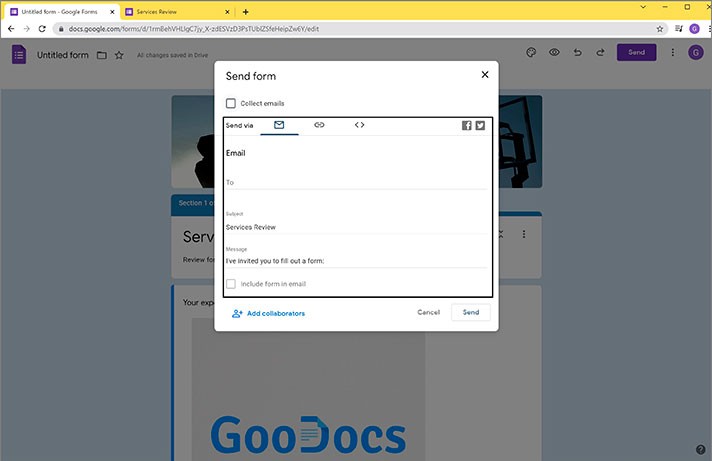
- Below we can invite specific people via email. Here you enter the person’s email address, and then it’s like your regular email with the subject and the message itself
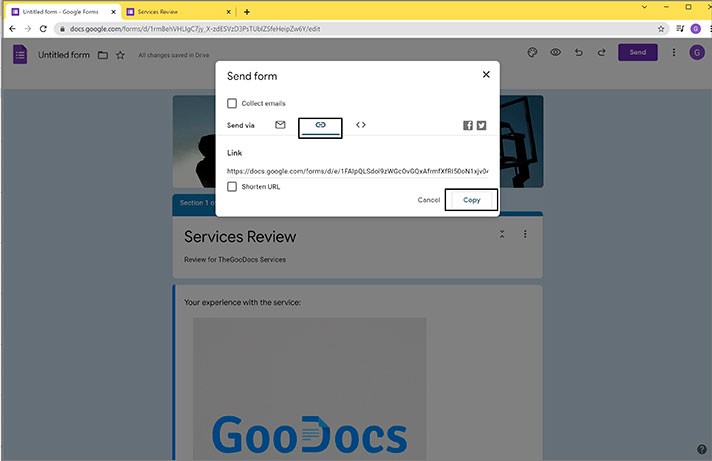
- The next page is for the most common option of sharing the survey, which is via the link by just sending it to everyone you want to interview. So, press Copy and send
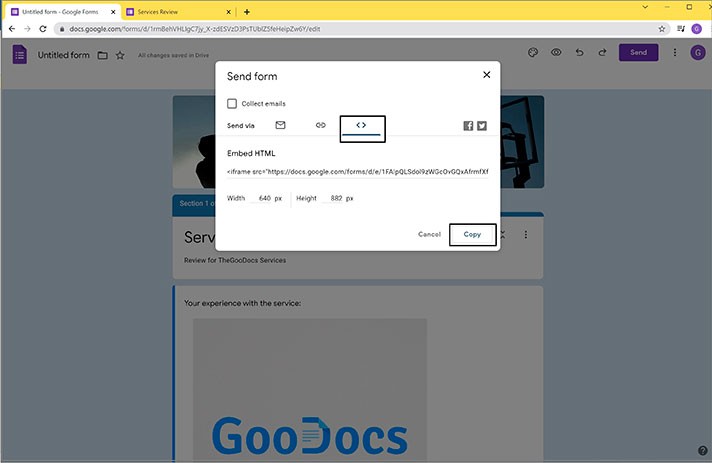
- And the last one allows you to embed the questionnaire into the website as an HTML code. Here you go
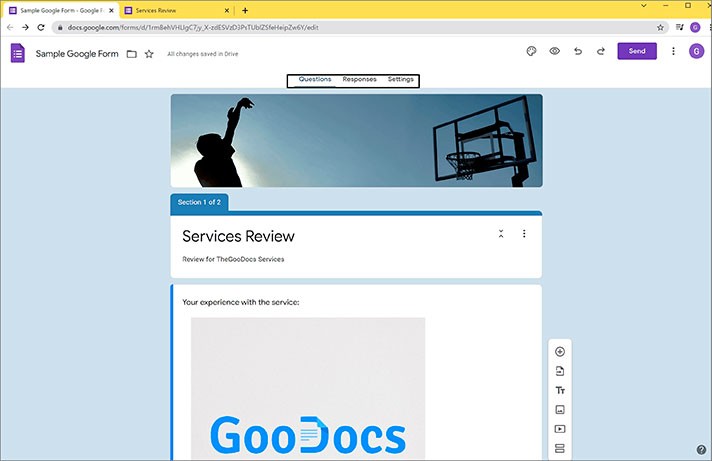
We hope this tutorial will help you learn how to make a Google Docs survey. Good luck!

We are a team of creative people who dream of sharing knowledge and making your work and study easier. Our team of professional designers prepares unique free templates. We create handy template descriptions for you to help you choose the most suitable one. On our blog, you'll find step-by-step tutorials on how to use Google Products. And our YouTube channel will show you all the ins and outs of Google products with examples.


