How to Change Date Format in Google Sheets?

Google Sheets is an online tool used by businesses and individuals to keep track of data. Dates are one of the most common types of data entered into spreadsheets. The default format in Sheets is "MM/DD/YYYY," but this format might not be suitable for everyone. It may be necessary to revise the existing format to suit personal or business needs. For example, if you're sharing a Google Sheet with people from different parts of the world, you might need to change the format to “DD/MM/YYYY,” which is more commonly used in countries like the UK, India, and Australia. Revising the format can make your data more accessible and easier to understand.
Google Sheets is an awesome tool for managing data. Dates are an essential part of data, and changing dates in Google Sheets can make it easier to understand and share your data. In this tutorial, we will show you the ways how to revise dates in spreadsheets.
Built-in Formats: Date Conversion
First of all, let's see how we can correct or revise (depending on your task) dates in Sheets using the built-in formats. For this tutorial, we’ll create a custom Google Sheet document with a simple data range. If you have a spreadsheet with data to convert for your studies or business, welcome to follow our simple, yet important guide J
Step 1: Open your Google Sheet and select the cells containing the dates you want to change.
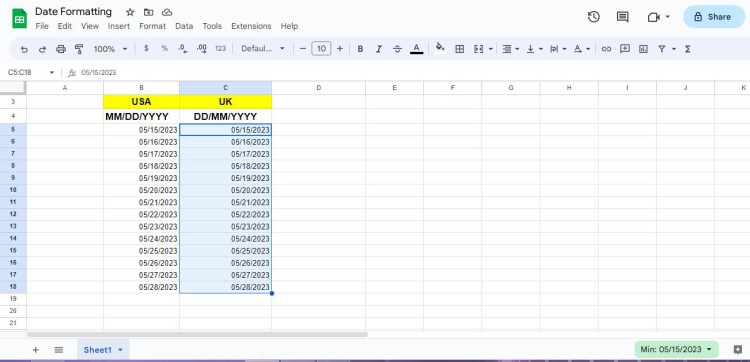
Step 2: Now go to the upper menu and choose Format > Number. In the Format Number sidebar, click on the prebuilt date format – DD/MM/YYYY.
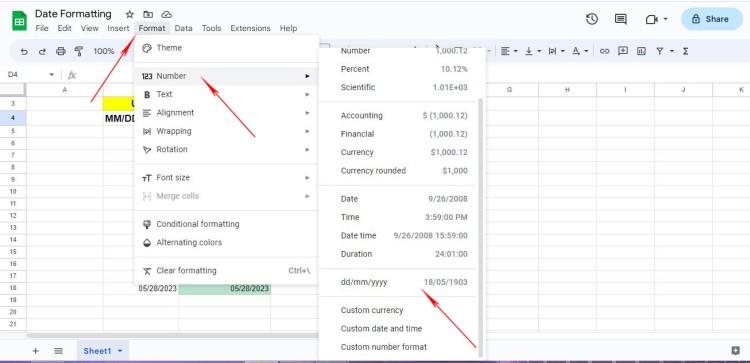
Congratulations! You have successfully changed the date format in Google Sheets.
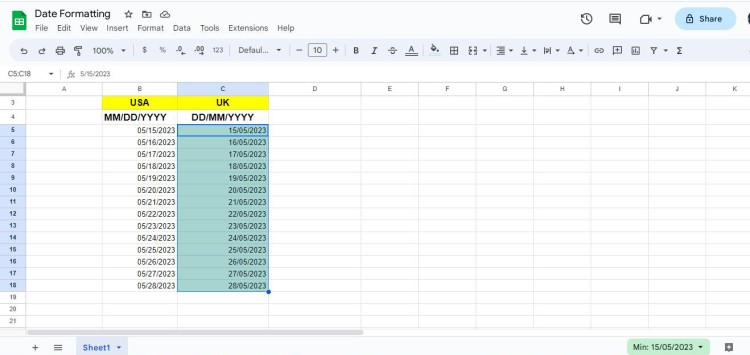
Or:
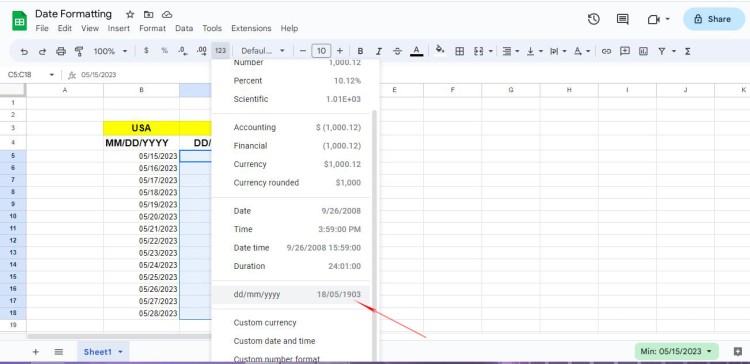
Step 1: Select the column or separate date’s cells and go to the toolbar – find a prebuilt option 123 called More Formats. Usually, this option is available on the toolbar by default.
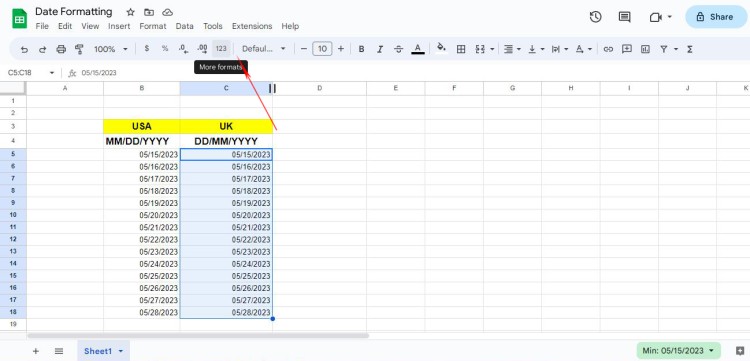
Step 2: Click on it to see the sidebar. Choose the suitable date format.
Before:
After:
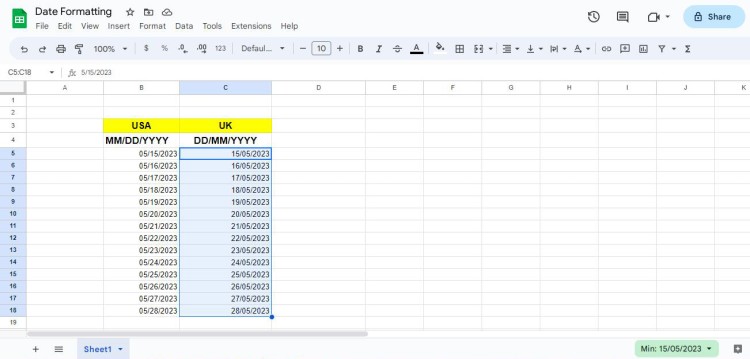
For more complicated data variables like typed-in months and figures (May 15, 2023, or May-15-2023) you may use prebuilt formats from Custom Date and Time.
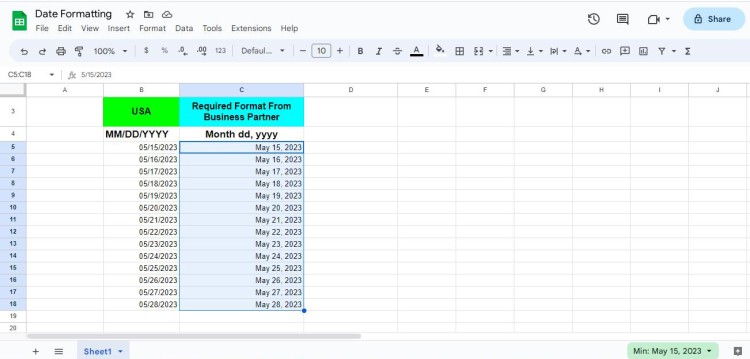
Let’s imagine your business partner requires a payment sheet in the format Month day, and year. Let’s see how we can manage it.
Step 1: Select the date range you need to convert.
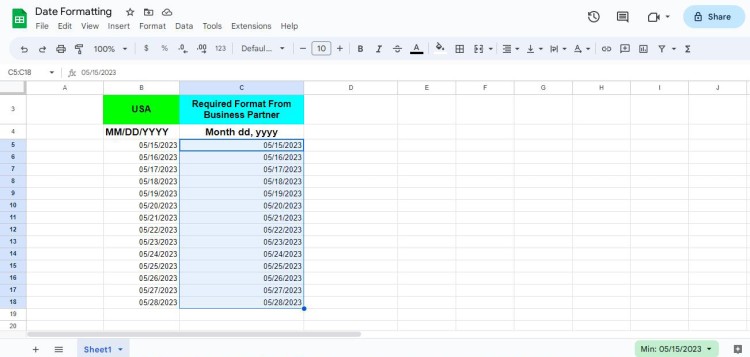
Step 2: Go to Format > Number> Custom Date and Time.
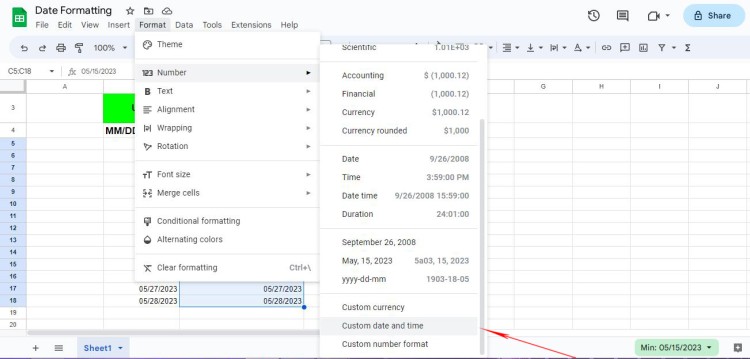
Step 3: Now the custom date window will emerge with a list of worldwide used formats. Feel free to check and experiment with the formats. Choose the one you need, and click Apply.
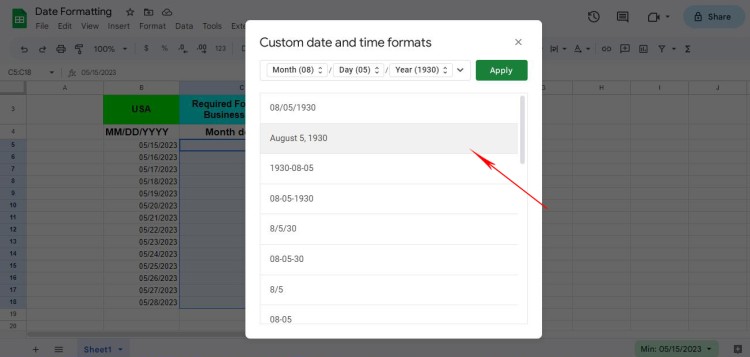
Now we got the result. So easy!
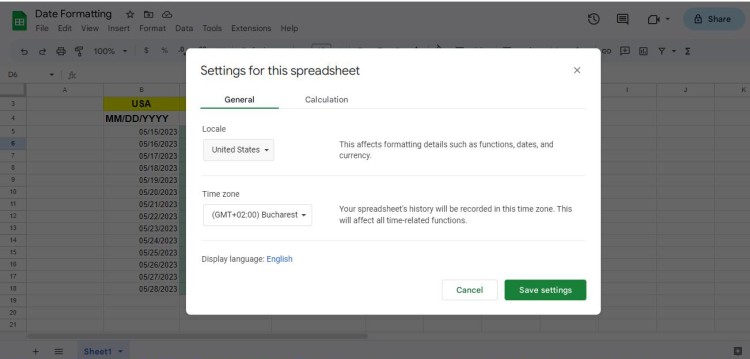
Friendly Tip: Pay attention to the Default Settings of the Locale in your Google Sheet editor. It influences default date conversion in the prebuilt options.
Customized Date Formats
But what if you are working with complicated data ranges and need to insert or customize the date according to specific requirements? Here is a decision within the option of Customized Date Formats.
Google Sheets provides a variety of customized date formats that you can use to tailor your data.
Here are some examples:
DD-MM-YYYY - 05-12-2021
MMM YYYY - Dec 2021
DDD, MMM DD - Tue, Dec 14,
and even more variables that depend on the company or business specifications.
To create a customized date format, follow these steps:
Step 1: Open your Google Sheet and select the cells containing the dates you want to change the format for.
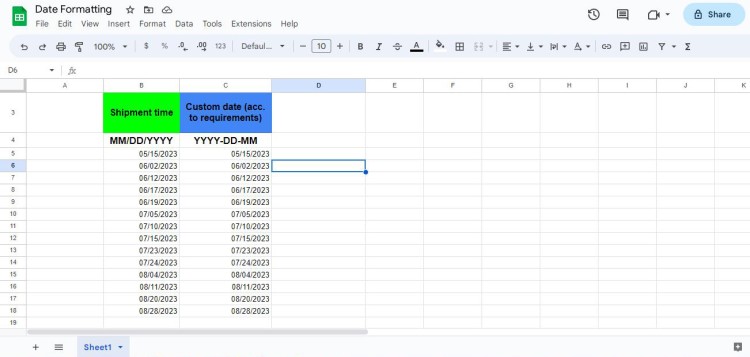
Step 2: Go to Format > Number and choose Custom Date Format from the drop-down menu.
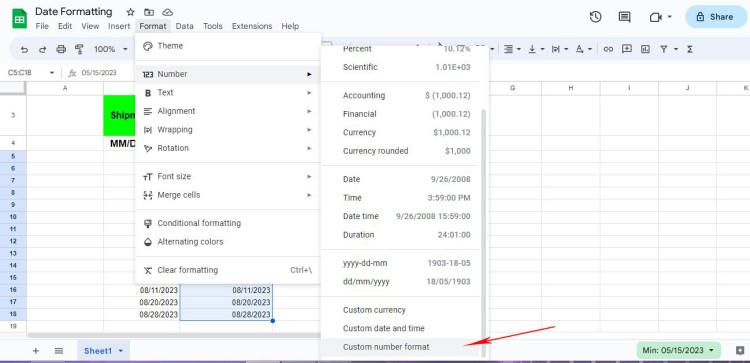
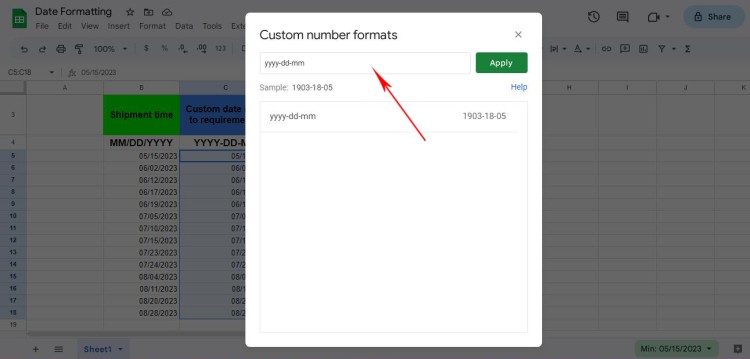
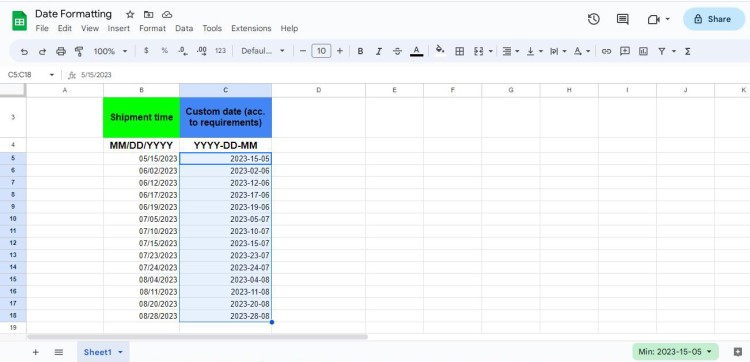
Step 3: You will see a search type bar, where you can type in desired format. For this tutorial let’s assume we need to change the date into the format used by the “imaginary” supplier in the format YYYY-DD-MM. Now let’s type in. Click Apply.
Congratulations! The job is done.
Google Sheets Date Formatting: FAQ
We know you have dozens of questions and we will try to cover as many issues with Sheets in our next tutorials as possible. But here we would like to answer on frequent-searched Google inquiries about date formatting.
FAQ:
Q. Can I change the date format for the entire sheet?
A. Yes, you can change the date format for the entire sheet by selecting all the necessary cells in the sheet and following the above steps.
Q. Can I change the date format of a single cell?
A. Yes, you can change the date format for a single cell by following the above steps and selecting the cell you want to change. Go Format > Number > Custom Date Format or insert your format into the search bar in the submenu Customized Date Formats.
Q. What is the default date format in Google Sheets?
A: The default date format in Google Sheets is based on your computer's default date format. However, if you want to change the default format, you can do so by going to File > Spreadsheet settings > General and selecting your preferred date format under Locale.
Q. How do I enter dates in Google Sheets?
A. To enter a date in Google Sheets, simply type the date in a cell using the format "mm/dd/yyyy" or "dd/mm/yyyy". Alternatively, you can use the Data > Data Validation feature to create a drop-down menu with pre-set date options to choose from.
Tips to Guide You through Working with Dates
Google Sheets is an essential tool for business professionals. It can help you organize, analyze, and manage data efficiently. However, one common issue that most users face is working with date formats. Handling dates can be tricky and time-consuming, especially when dealing with large data sets. In this essay, we will provide five tips on how to work with date formats in Google Sheets.
- Firstly, it is essential to understand the different date formats available in Google Sheets. The default format in Sheets is MM/DD/YYYY, but you can select a different format by using the Format > Number > More formats > More date and time formats option. You can choose from several different formats, including those in the international date notation (YYYY-MM-DD or DD/MM/YYYY) and those using the month name (January 1, 2022).
- Secondly, it is crucial to ensure that the date format you choose matches the date format used in your data source. If you copy and paste data from a different application, such as a database or a website, ensure that the date format is consistent with the format in your sheet. Otherwise, Google Sheets may misinterpret the data, leading to incorrect results.
- Thirdly, if you need to perform calculations or analysis with dates, it is best to convert the dates into a common format, such as the number of days since a particular date. You can do this by using the DATEDIF function or by subtracting one date from another to get the number of days between them.
- Fourthly, Google Sheets also offers a range of tools for filtering and sorting dates. You can use the filter feature to display data based on a specific date range, such as all records from January to March. You can also use the sort feature to arrange data in chronological order based on the date column.
- Last, it is essential to remember that Google Sheets stores dates as serial numbers. This means that if you enter a date, it is stored as a number representing the number of days since December 30, 1899. Therefore, if you want to display the date and not the serial number, you need to apply a date format to the cell.
In conclusion, working with date formats in Google Sheets requires some effort and knowledge. Using the format prebuilt options and custom format can save time and help to manipulate data easily. By following these tips, one can work efficiently with dates, streamline workflows, and make more informed business decisions.
So did you find this tutorial helpful? We hope you can use our guides to improve your workflow and stay effective.
Get friendly with dates and forget about headaches!

We are a team of creative people who dream of sharing knowledge and making your work and study easier. Our team of professional designers prepares unique free templates. We create handy template descriptions for you to help you choose the most suitable one. On our blog, you'll find step-by-step tutorials on how to use Google Products. And our YouTube channel will show you all the ins and outs of Google products with examples.


