Top categories

Newspapers Newsletters Restaurant menus Resume Brochures

Business

Agendas Budgets Business cards Business plans Business proposals Invoices Letterheads Project management Reports

Documents

Articles Cover letters Press Releases

Education

Books Class schedules Classroom announcements Classroom decors Education presentations Family Tree Lesson plans Newspapers Notes Planners Schedules Worksheets

Marketing

Amazon product Award certificates Booklets Brochures Catalog Certificates Flyers Handouts Headers Labels Magazines Newsletters Portfolio PostCards Posters Restaurant menus

Other

Google Drawings Sheets

Personal

Calendars Checklists CVs Funeral Programs Invitations Itinerary Journals Lists Photo Albums Recipes Resume

Social Media

Facebook Cover Facebook Posts Instagram Posts Instagram Stories YouTube Thumbnail
All Free Templates Blog Tips & Tutorials Requests
Templates
  • Top
  • Newspapers
  • Newsletters
  • Restaurant menus
  • Resume
  • Brochures
  • Business
  • Agendas
  • Budgets
  • Business cards
  • Business plans
  • Business proposals
  • Invoices
  • Letterheads
  • Project management
  • Reports
  • Documents
  • Articles
  • Cover letters
  • Press Releases
  • Education
  • Books
  • Class schedules
  • Classroom announcements
  • Classroom decors
  • Education presentations
  • Family Tree
  • Lesson plans
  • Newspapers
  • Notes
  • Planners
  • Schedules
  • Worksheets
  • Marketing
  • Amazon product
  • Award certificates
  • Booklets
  • Brochures
  • Catalog
  • Certificates
  • Flyers
  • Handouts
  • Headers
  • Labels
  • Magazines
  • Newsletters
  • Portfolio
  • PostCards
  • Posters
  • Restaurant menus
  • Other
  • Google Drawings
  • Sheets
  • Personal
  • Calendars
  • Checklists
  • CVs
  • Funeral Programs
  • Invitations
  • Itinerary
  • Journals
  • Lists
  • Photo Albums
  • Recipes
  • Resume
  • Social Media
  • Facebook Cover
  • Facebook Posts
  • Instagram Posts
  • Instagram Stories
  • YouTube Thumbnail
Blog Tips & Tutorials Requests
Premium Templates Add to Chrome
GoodDocs
GoodDocs
All categories
Popular Categories
  • All Categories
  • Newspapers
  • Newsletters
  • Restaurant menus
  • Resume
  • Brochures
Formats
  • All Formats
  • Google Docs
  • Google Sheets
  • Google Slides
  • Google Drawings
  • Main
  • Tips & Tutorials
  • Google Documents Tutorials
  • How to Add an Arrow in Google Docs?

How to Add an Arrow in Google Docs?

calendar
May 18, 2022
eye
5866
In this tutorial, we will show you how to add an arrow in Google Docs. We recommend you study this manual carefully and start practicing!
How to Add an Arrow in Google Docs?
Checklist of crucial points we aim to highlight here:
  1. Entering the Drawing Mode
  2. Drawing an Arrow
  3. Customizing the Arrow
  4. Other Lines and Arrows

This time we’re showing you how to draw arrows in Google Docs.


We love Google Docs for its simplicity. And that certainly goes for drawing simple figures like lines and arrows! Google Docs offers several types of lines to draw, and the best thing about it is that you can make an arrow out of basically any type of line in Google Docs. And now let’s start adding arrows in Google Docs!Watch the video from https://thegoodocs.com/ and find out how to add an arrow in Google Docs:

Entering the Drawing Mode

Drawing lines and arrows in Google Docs means creating an image first. And creating the image in Google Docs means entering the drawing canvas. So, we start with entering the drawing mode. 
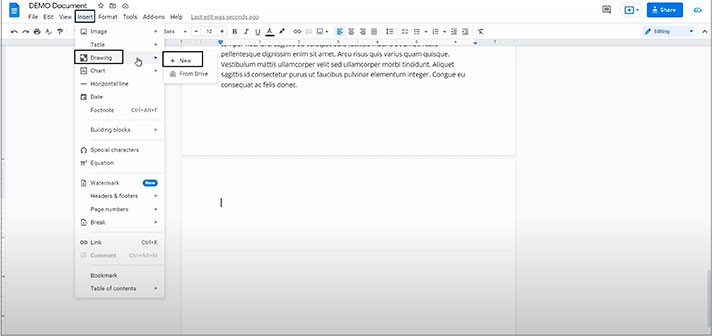
  • We click on the “Insert” item on the toolbar at the top of the page, then we go down to the third item — “Drawing”, and then we press “New” on the right
1
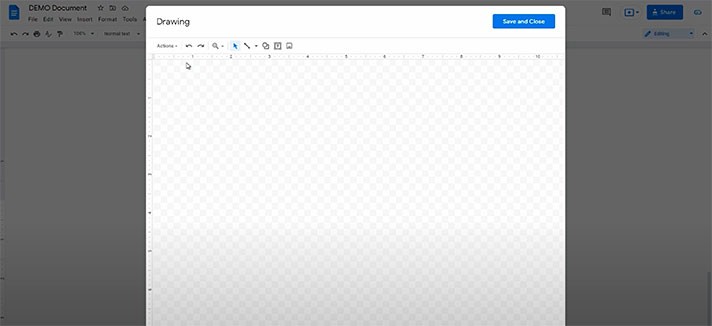
  • That opens a drawing canvas, which is the basis for creating lines, shapes, and drawings in Google Docs. And normally, at first, you create elements to connect them with arrows — shapes, text boxes, or, for example, uploading images to draw over them, etc.
2
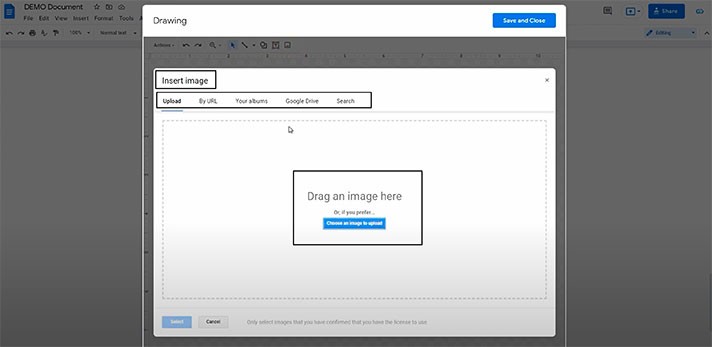
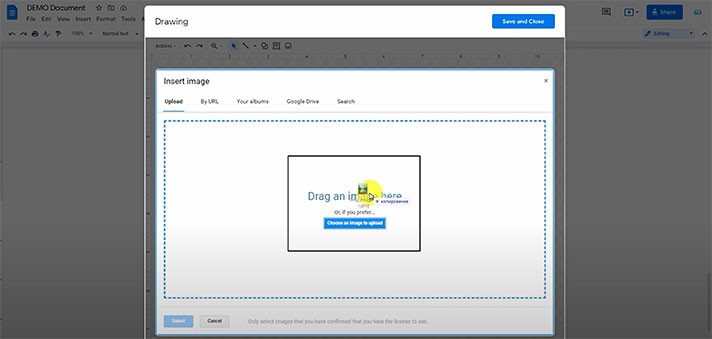
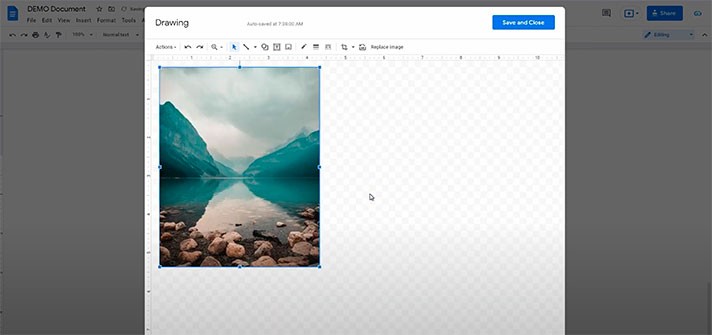
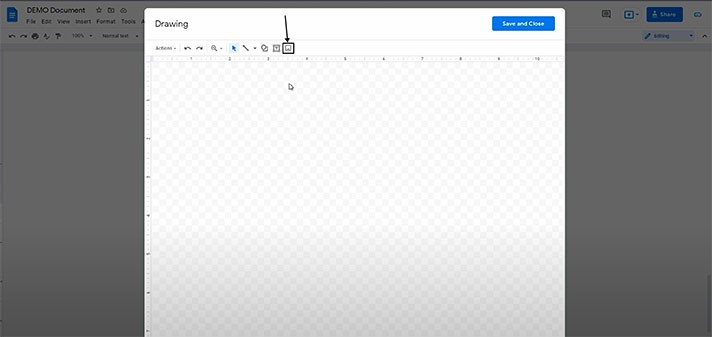
  • So, let us quickly upload a sample image from the computer. We will select a random image just to show you how it works. We press the rightmost icon to insert an image, and then we’re just dropping it here from our PC. And you can choose any other method of inserting the image
3
4
5
6

Drawing an Arrow

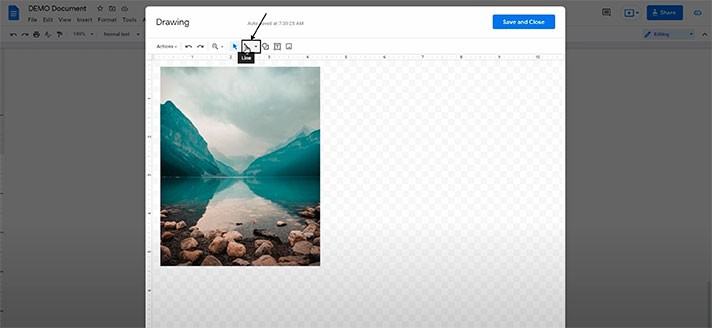
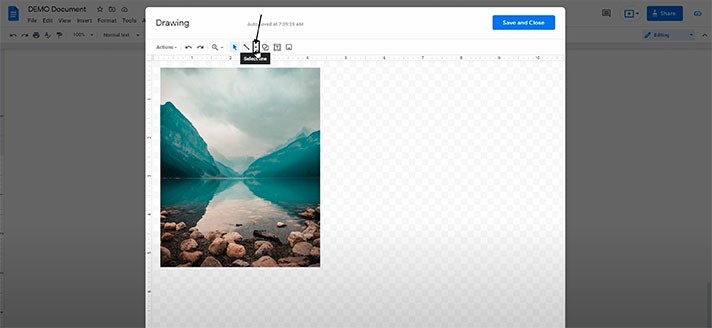
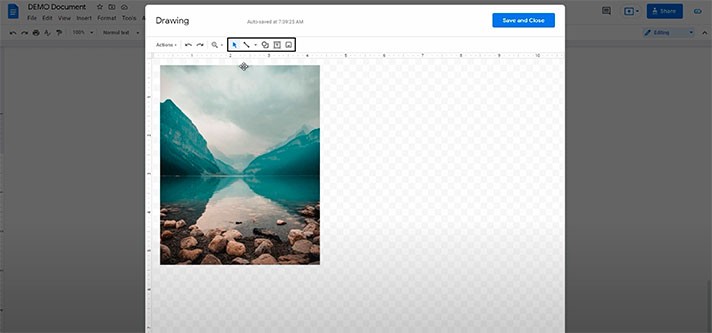
  • Here are the tools you work with in the drawing workspace, where we need the button standing for line drawing — “Line”. But to make it exactly an arrow, it’s a little down arrow symbol (“Select line”) that we click on
7
8
9
10
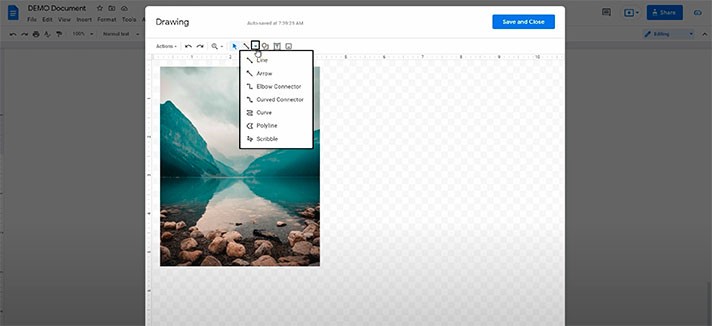
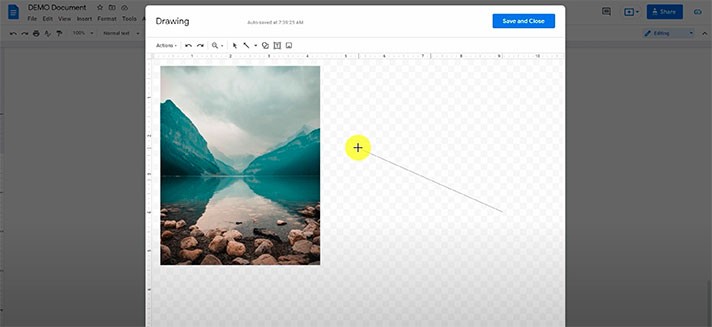
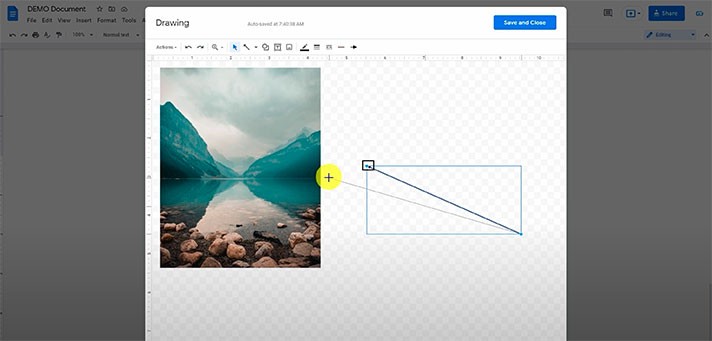
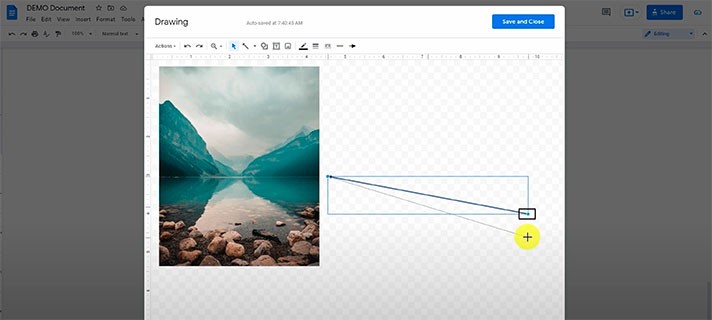
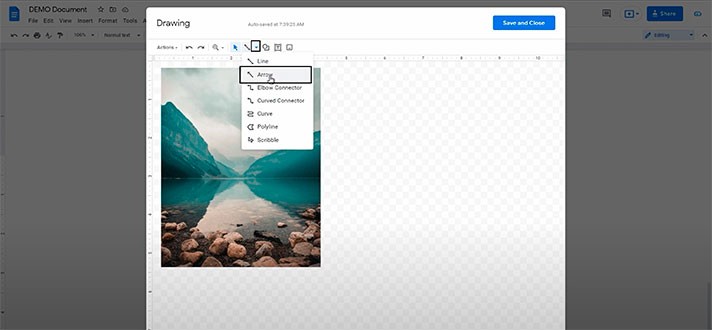
  • And here, we select the second line type — “Arrow” — and draw it. Put the mouse pointer where you want the arrow to start, press-hold and move it to the end point, then release, and here you are. This is a sample of the simplest line with the arrow at the end of it
11
12
13
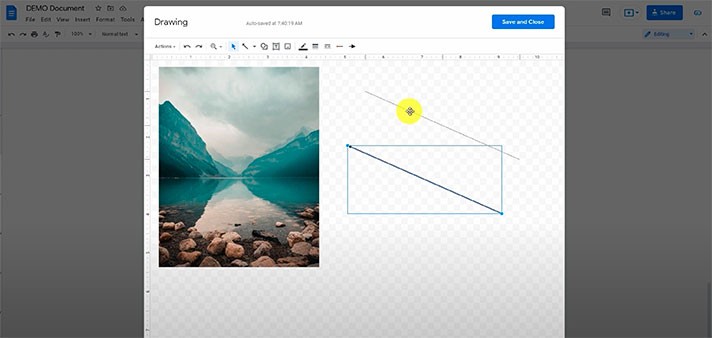
  • Then you may want to change its position on the canvas. And to do that, exit the drawing mode by pressing “Esc” on the keyboard. Now press-hold on the line and drag it where you want it to be. If you're going to resize it and change the position start and end point, pull from either end of the line where you see the circles, and you’ll be able to rearrange the position of the line end and start points
14
15
16
lamp
NB! Please keep in mind that when you are going to work with an object on the drawing canvas, for example, with the arrow, you need to select it first. For instance, you can do this very easily with the mouse click on the object you need to work with, customize, etc.

Customizing the Arrow

And then, we will show you how to customize the look(s) of the arrow(s). 
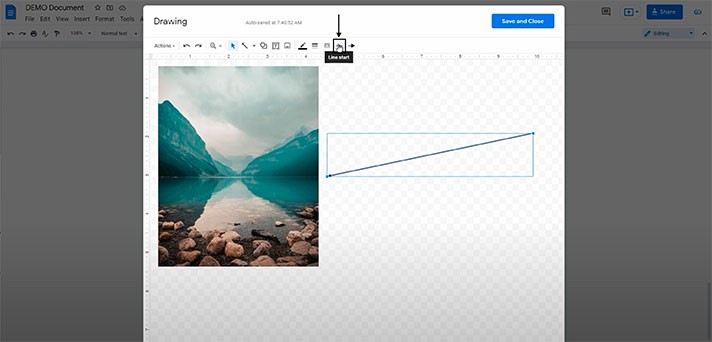
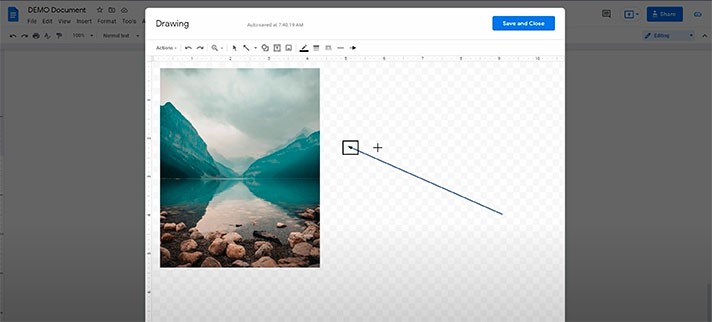
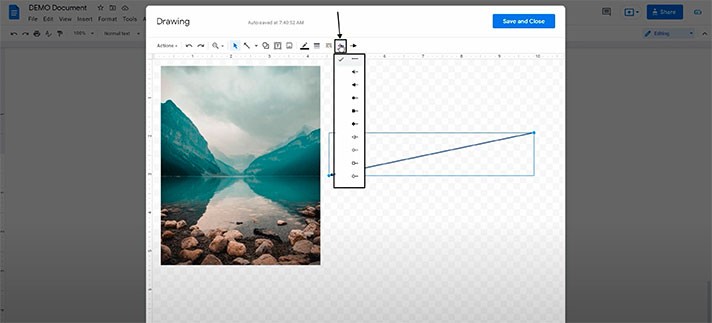
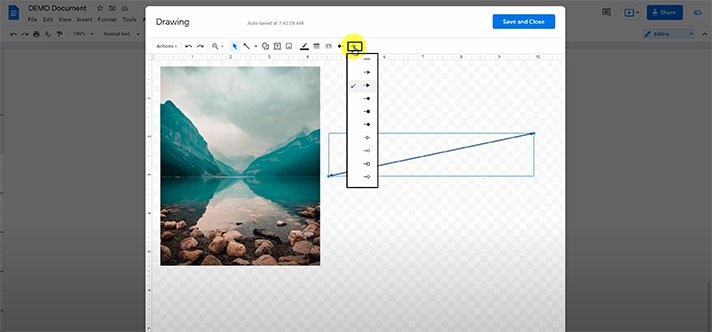
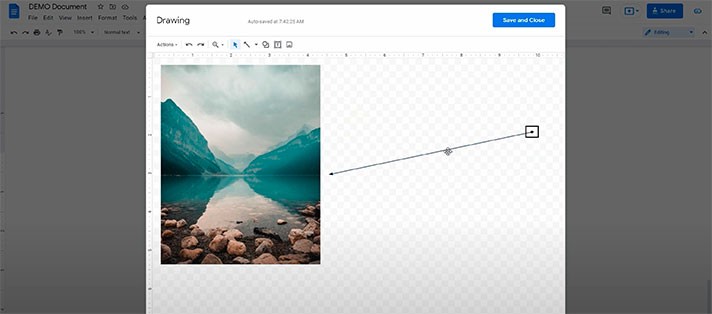
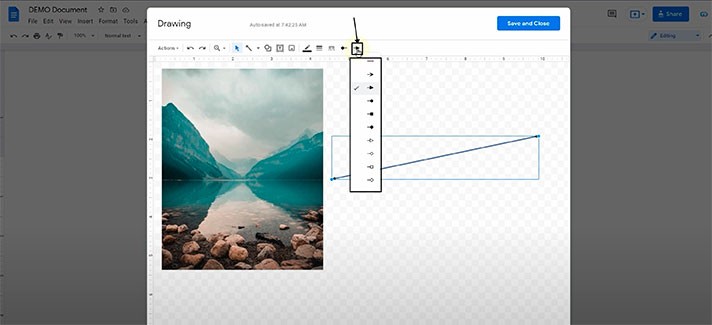
  • First of all, we can add an arrowhead to the start point. For that, press on the last but one icon on the toolbar — this one that points to the left, “Line start” — and select which one you like more in the drop-down. For example, we will choose a random start point here just to show you how it works
17
18
19
20
21
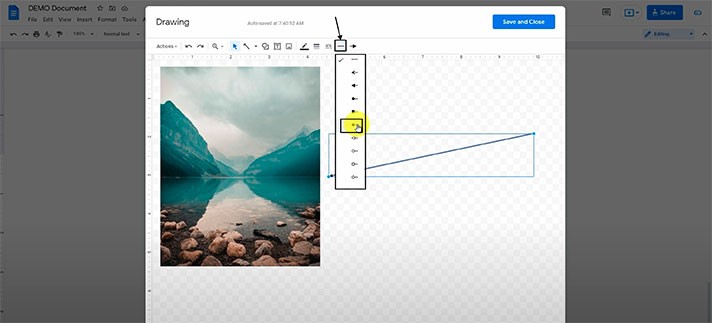
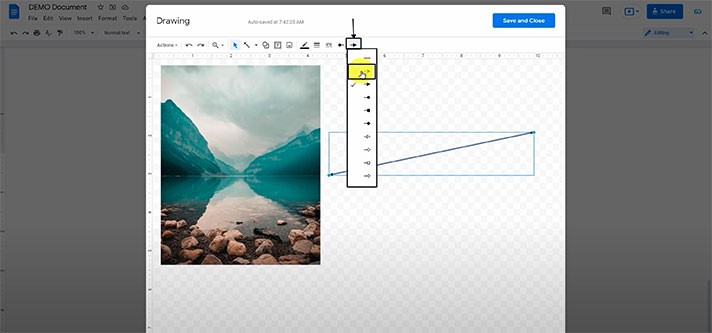
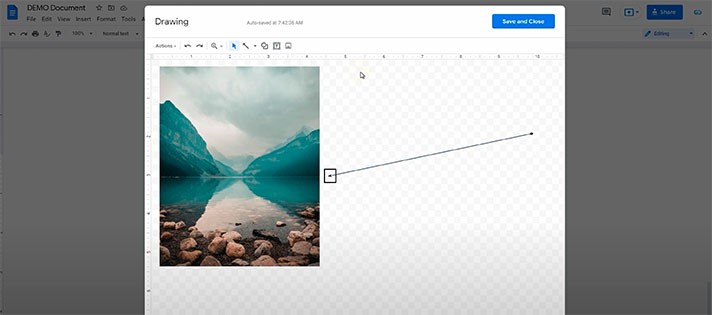
  • And in the same way, you can change the looks on the end point of the arrow. It’s the button with the arrow pointing to the right, “Line end”. And then select which one you like as well. We are going to choose a random item just to show you how it works
22
23
24

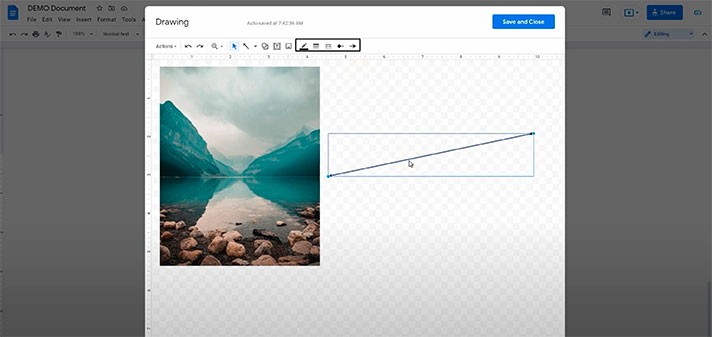
Then we can customize the looks of exactly a line. Here on the toolbar, these are the tools for doing that.
 

25
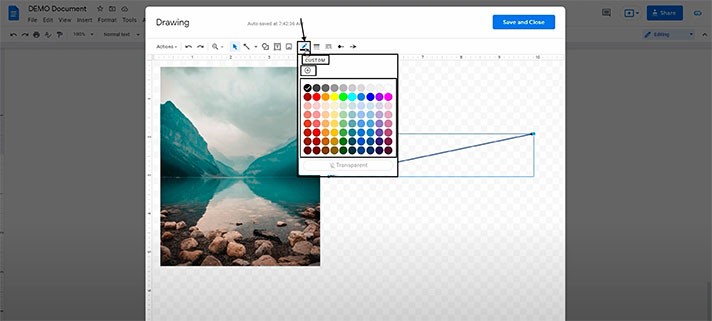
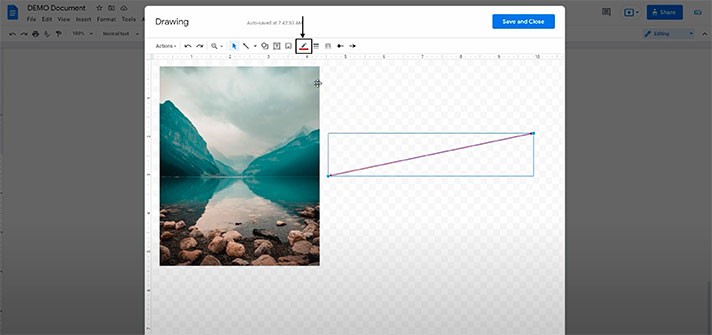
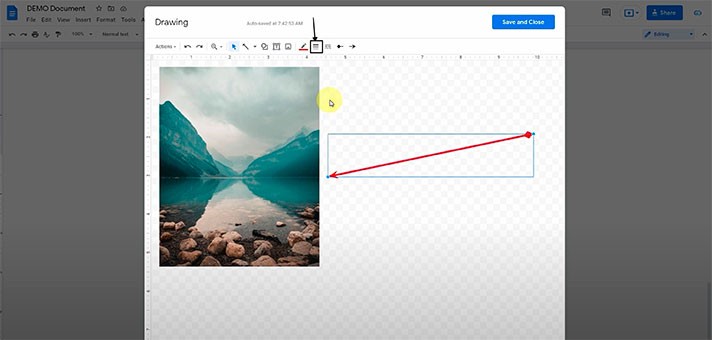
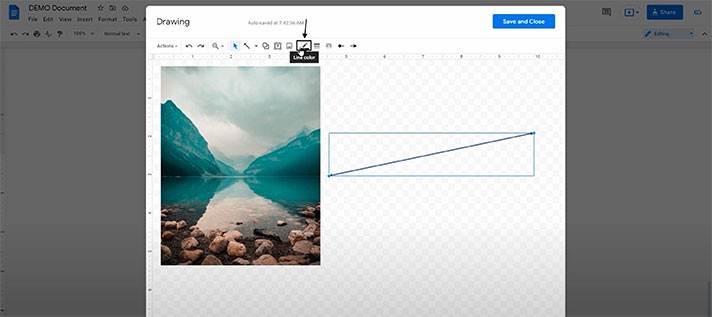
  • For example, we will start with “Line color”, where you choose either some standard color or a custom one with the plus icon. We will choose a random color to show you how it works — this is a red one, for instance
26
27
28
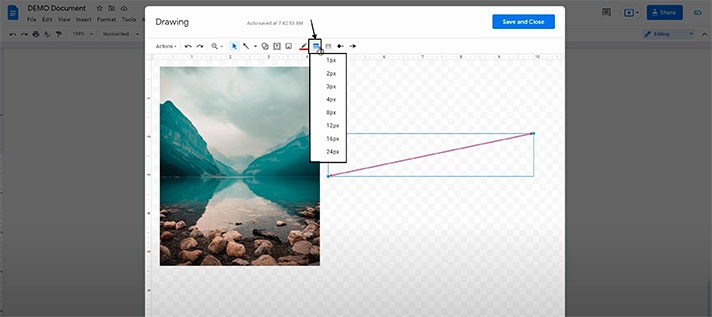
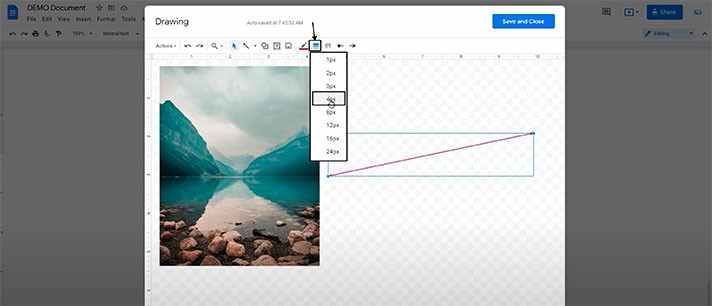
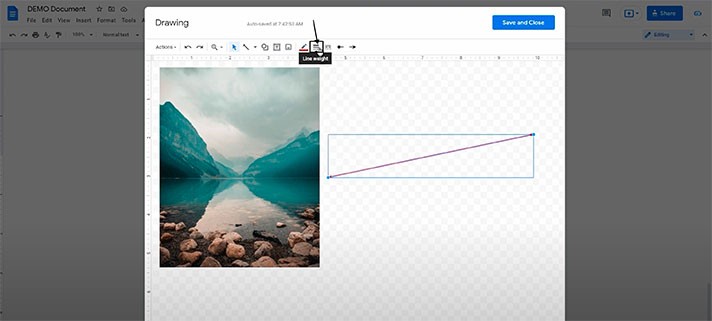
  • Next on the menu, we have “Line weight”, where you basically select how thick you want your line to be. For instance, let’s do 4 pixels
29
30
31
32
  • And then it's “Line dash” if you’d like
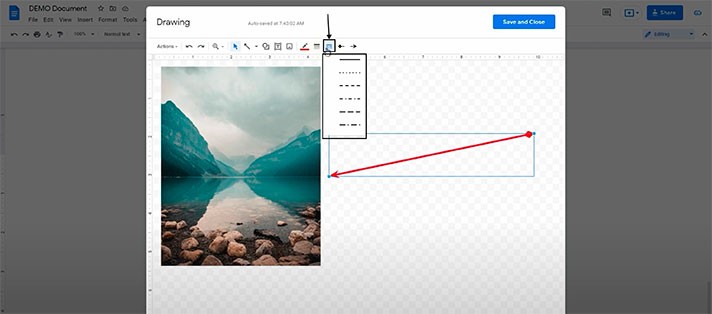
33
  • So, we have customized this arrow a bit. You already know about the “Line start” and “Line end”, and we have already customized these items, too. And you will apply the customization you need
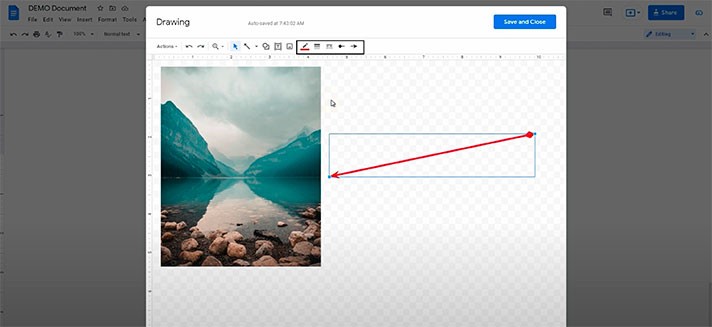
34

Other Lines and Arrows

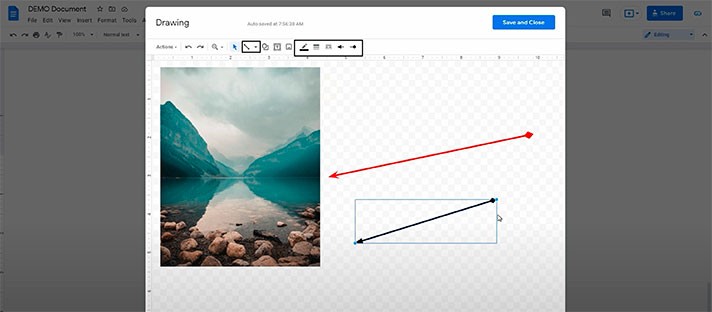
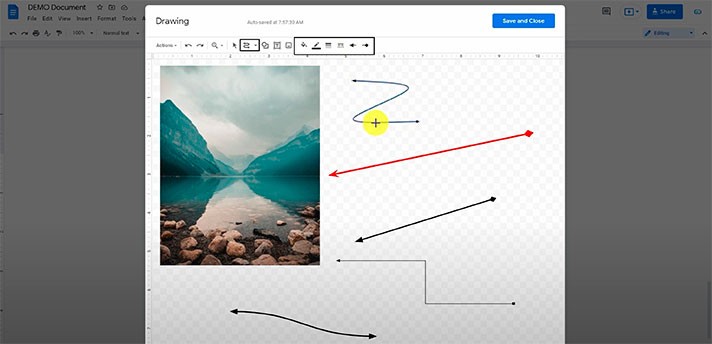
  • We think the most awesome feature for lines in Google Docs is that you can make an arrow out of any type of line here, starting from the basic one. We’ll select it here in the drop-down for lines (you will see the screenshot below)
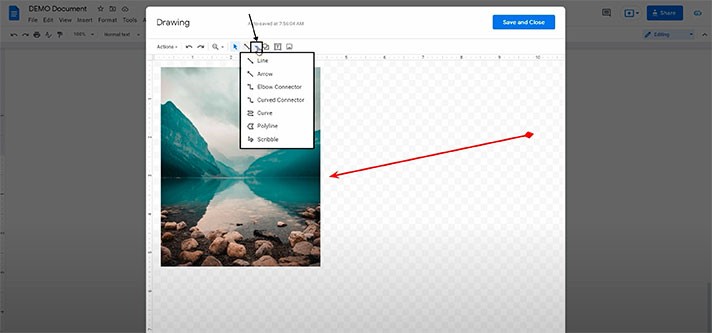
35
  • The first item here is “Line”. Now we are drawing a simple line. And then we are just adding arrowheads to the line end and start points just like we did earlier with these icons. There you go
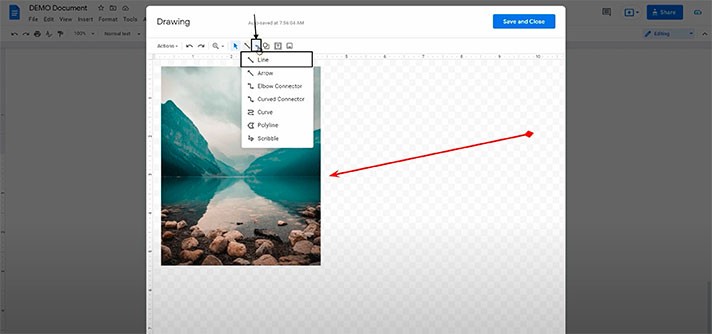
36
37

Now let’s practice with other lines in the drop-down list in the menu. 
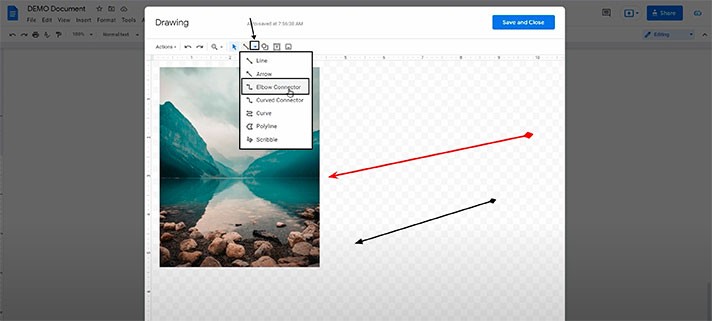
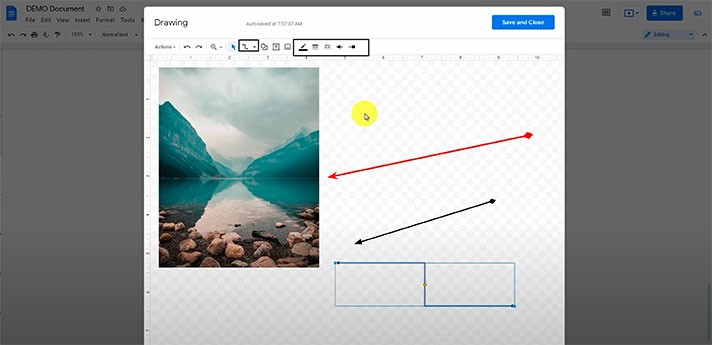
  • Then in the drop-down, the third item here is “Elbow Connector”. This is the line that is bent in the middle. And when you draw it, it adapts to where you place the end point. We’ll remind you once again: you can change the position of the start and end points by pulling either end of the line. And then we are adding the random arrowheads to it
38
39
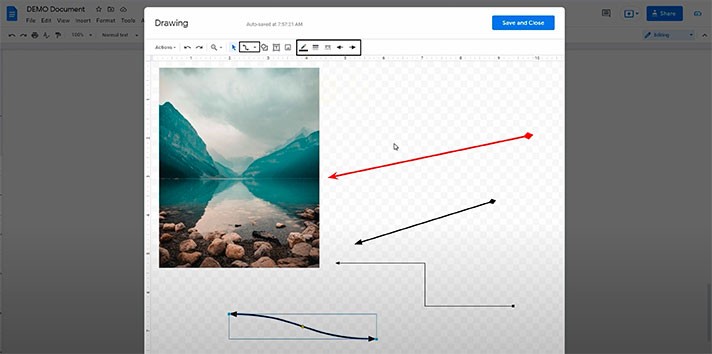
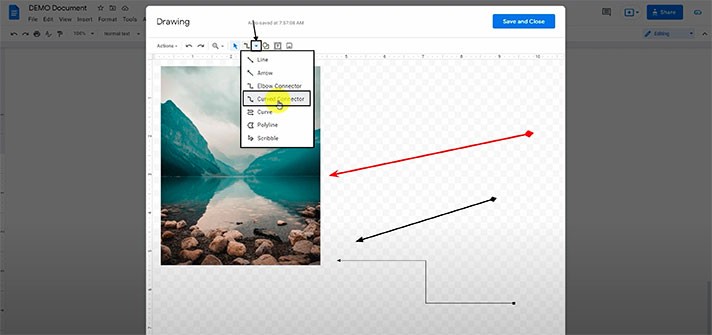
  • The same concerns the next line type. This is the “Curved Connector” item in the drop-down menu. Let’s draw it and add the sample arrowheads to it just to show you how it works
40
41
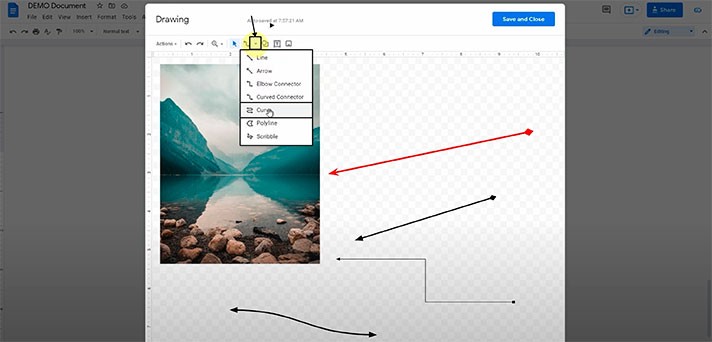
  • And then, for example, we choose the classic “Curve” item on the menu. Let’s add it here and customize it a bit
42
43
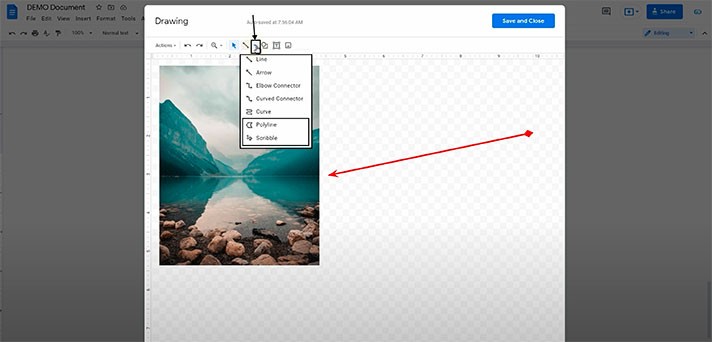
  • And so on — you can choose any line type(s) you need and customize it (them). Here, in this drop-down list of line types, we have “Polyline” and “Scribble”, too. So, select what you need and customize the lines and arrows according to your requirements and/or ideas
44

We hope this tutorial will help you learn how to add an arrow in Google Docs. Good luck!

author
Written by
Team TheGoodocs

We are a team of creative people who dream of sharing knowledge and making your work and study easier. Our team of professional designers prepares unique free templates. We create handy template descriptions for you to help you choose the most suitable one. On our blog, you'll find step-by-step tutorials on how to use Google Products. And our YouTube channel will show you all the ins and outs of Google products with examples.

Popular Tutorials
How to Get and Use Google Docs Templates?
How to Get and Use Google Slides Templates for Free?
How to Search for a Word in Google Docs?
How to Add an Arrow in Google Docs?
Popular Templates
Old Times Newspaper - free Google Docs Template - 307
Old Times Newspaper
Vintage Newspaper - free Google Docs Template - 294
Vintage Newspaper
Restaurant Menu Design - free Google Docs Template - 118
Restaurant Menu Design
Elegant Newspaper - free Google Docs Template - 109
Elegant Newspaper
  • Sell your content
  • File Licenses
  • Terms and Conditions
  • Privacy Policy
  • Support
  • Cookie policy
© 2023 thegoodocs.com. All rights reserved

This Website uses cookies!

We use cookies to improve user experience within the website https://thegoodocs.com/ (the “Website”), analyzing Website’s traffic and trends as well as remembering user preferences and settings. For these reasons, We may share your app usage data with our analytics partners. By clicking “Accept Cookies,” you consent to store on your device all the technologies described in our Cookies Policy https://thegoodocs.com/static/cookies.php. More information about your data processing might be found in the Privacy Policy.

Accept all cookies Decline all